How to get Amazon-ready white background product photos
Shoppers decide on your product from the photo in a fraction of a second. Here is what Amazon's white-background rule really means, and a simple workflow to hit it every time.
 by EZDeals4U · October 2026
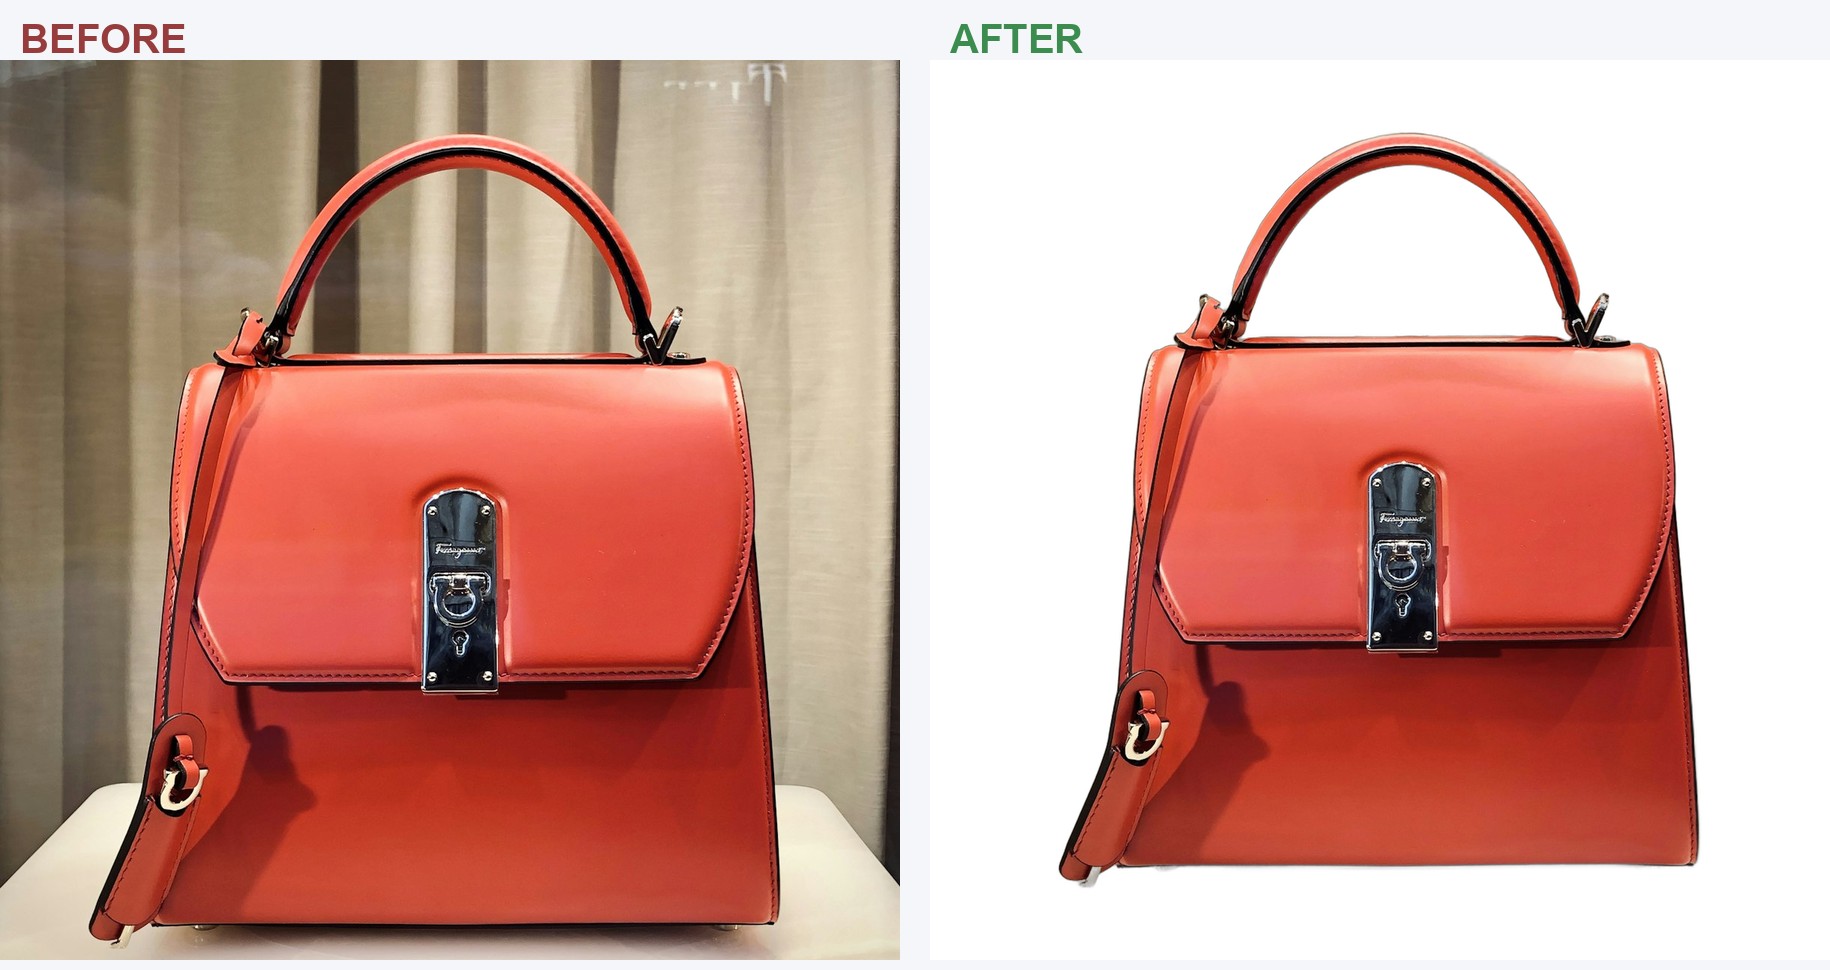
Your product can be excellent and your listing copy can be perfect, but shoppers make a decision about the photo in a fraction of a second. Put a product shot on a kitchen counter, give it a slightly grey background, or leave a distracting shadow around the edges, and it can look amateur next to a competitor's clean catalog image.
On Amazon, that isn't just a cosmetic problem. The main image has specific requirements, and a background that looks "white enough" to you may not actually meet them.
The good news is that you don't need an expensive studio to get the result Amazon wants. A decent phone photo, good lighting, and the right editing workflow are usually enough.
What Amazon actually requires
Amazon's requirements for the main product image, the first image shoppers see in search results, are specific. Getting these details right matters, because the main image is subject to Amazon's image requirements and automated checks.
The main image spec
- Background Pure white. Not cream, not light grey. The target is RGB 255, 255, 255.
- Product size Fills about 85% of the frame, centered and in sharp focus.
- No extras No text, logos, borders, watermarks, props or additional products.
- Resolution At least 1000 px on the longest side so zoom can work. 1600 px or more is better.
- Format & color JPEG is safest, in the sRGB color space.
The detail that catches sellers out most often is the background. "Looks white" and "is pure white" are not necessarily the same thing. A background that looks perfectly white on your phone can still contain a slight grey or color cast.
The dependable approach is to remove the background, then place the product on a true 255, 255, 255 canvas. It's faster than fighting for a perfect shot, and it passes every time.
The fast workflow, step by step
Shoot simply, in good light
You don't need a professional studio to get a usable source photo. Place the product on a plain surface near a window, use soft daylight, and avoid harsh shadows or direct glare.
Keep the entire product in the frame and make sure it is sharp and in focus. Don't spend hours trying to make the background perfect. If you're removing it later, the important thing is getting a clean, well-lit product shot.
Remove the background and place on true white
This is the step that makes the biggest difference. Remove the original background cleanly, then place the isolated product on a pure-white canvas at RGB 255, 255, 255. Pay particular attention to small details around edges, handles, straps, transparent areas and other difficult contours.
Save a transparent version too. That gives you a reusable product cutout for lifestyle images, infographics and other secondary listing images.
Size and export to spec
Scale the product so it fills roughly 85% of the frame without cutting off any part of it. Export at 1600 px or larger on the long edge, as a JPEG in sRGB. The exact tool matters less than consistency: use the same approach across your catalog so your products have a uniform look when shoppers scroll through your listings.
Save the plain-white one for the main image only
The pure-white requirement applies to the main image. Your secondary images give you much more room to show the product in context. Use those slots for lifestyle photography, props, infographics, detail shots and text callouts. The main image should answer one question immediately: "What exactly am I buying?"
Doing it for a whole catalog
Editing one product photo is manageable. Editing fifty is where the process changes completely. If every image requires uploading, removing the background, fixing the canvas, resizing, exporting and checking the result by hand, a seemingly simple photo task can consume an entire afternoon.
This is the gap we built Cutout to fill. It's a desktop app that takes a whole folder of phone photos, removes the backgrounds, places products on pure white or a custom backdrop, sizes them for Amazon, Etsy and eBay, and tells you whether each main image passes the white-background rule before you upload.
It also runs on your own computer, so your photos stay on your machine. And because it's a one-time purchase rather than a monthly subscription that charges you per image, the economics make more sense once you're processing a large catalog.
A few things that quietly cause failures
- Leftover shadow on the main image. A soft natural shadow can work well in lifestyle photography, but don't let an unwanted shadow turn your supposedly white background grey.
- Color cast from the original backdrop. Shoot on a colored towel or surface and you can end up with a tint around the product edges. Check the edges carefully and clean up any color contamination.
- Cropping too tight. The product should fill the frame, but every part of it still needs to be visible. Don't sacrifice the product's edges just to make it look larger.
- Low resolution. Images under 1000 px on the longest side may not support Amazon's zoom requirement. Starting with a high-resolution source gives you room to crop and resize cleanly.
Get these details right and product photography becomes much less mysterious. The goal isn't a masterpiece every time. It's a simple, repeatable process that produces clean, consistent images across your entire catalog.
And that consistency matters. When shoppers compare several products in search results, a crisp main image instantly makes your listing look more polished and easier to understand. For a new seller, getting the photography right can be one of the simplest, highest-impact improvements you make.