
Monkey Wrench
Shop management for independent auto repair shops · User Guide
This is the full user guide for Monkey Wrench. The same guide is built into the app (Help). Get Monkey Wrench · one price, no monthly fees.
Your whole shop in one app, on the computer you already own: repair orders and invoices, parts and inventory, warranties, cores and deposits, follow-ups, tools and equipment, people and time, expenses with receipts, profit, and records your accountant can use. It works offline. You pay once.
- Getting started
- Repair orders
- Estimates & the customer's OK
- Invoices
- The dashboard
- Customers & search
- Inventory & reordering
- Warranties
- Cores & deposits
- Follow-ups
- Tools & equipment
- People & time clock
- Profit & Loss and expenses
- Records & receipts
- The audit ledger
- Backup & restore
- Settings & reminders
- Privacy, security & help
1. Getting started
Open Monkey Wrench from the Start menu. The first time, enter the license key from your purchase email (a one-time online activation); after that it works without the internet. Your data stays on this computer.
- Settings → Shop: your labor rate and parts markup (for example 40%: a part that costs you $10 is charged at $14).
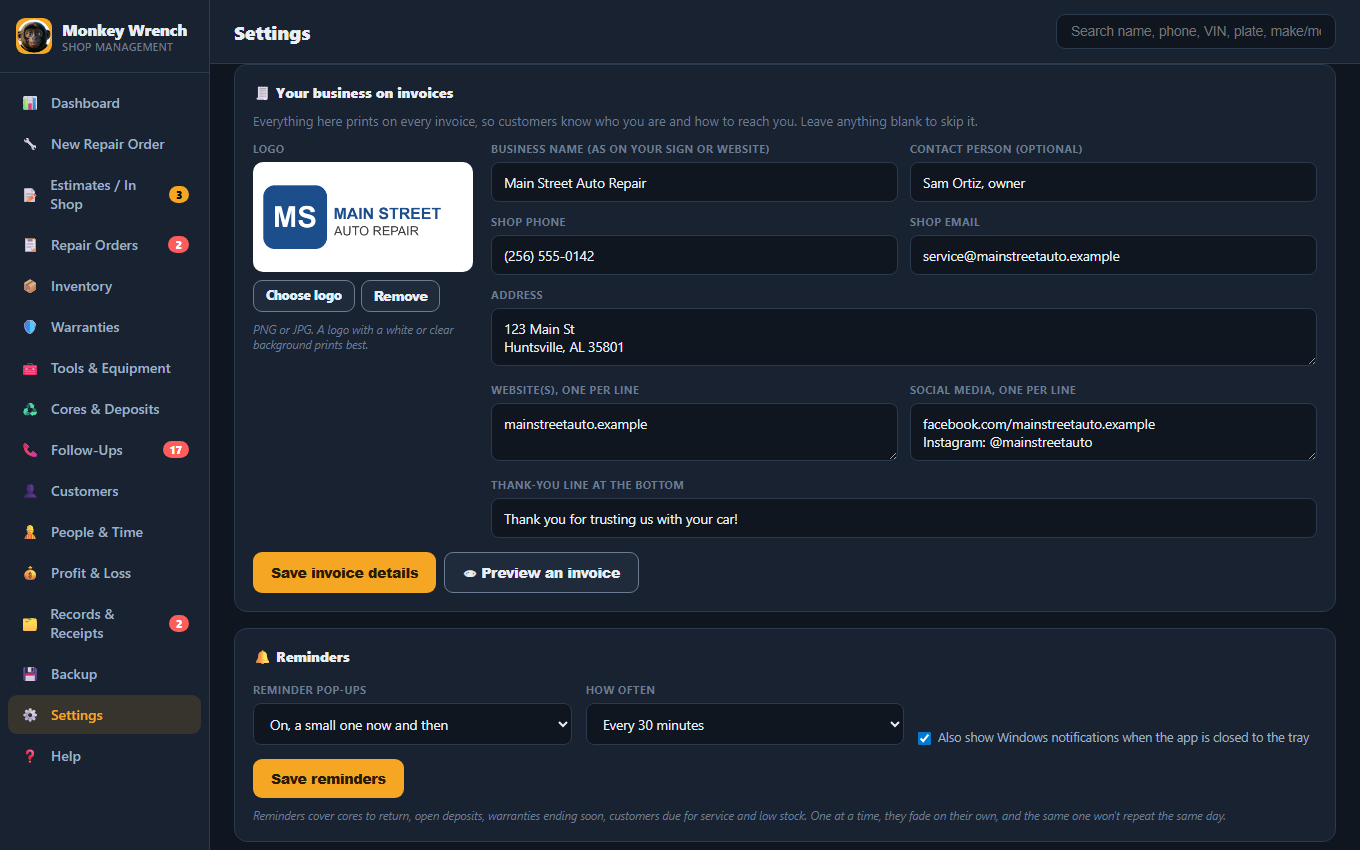
- Settings → Your business on invoices: logo, name, address, phone, email, website and social links. See Invoices.
- People & Time: add your mechanics and anyone else you pay. Mechanics appear in the technician list on repair orders.
- Backup: choose a USB drive or cloud folder. Do this on day one.
2. Repair orders
The screen you'll use all day. One save updates inventory, warranties, profit and follow-ups. The same screen writes up an estimate for the customer to approve first.
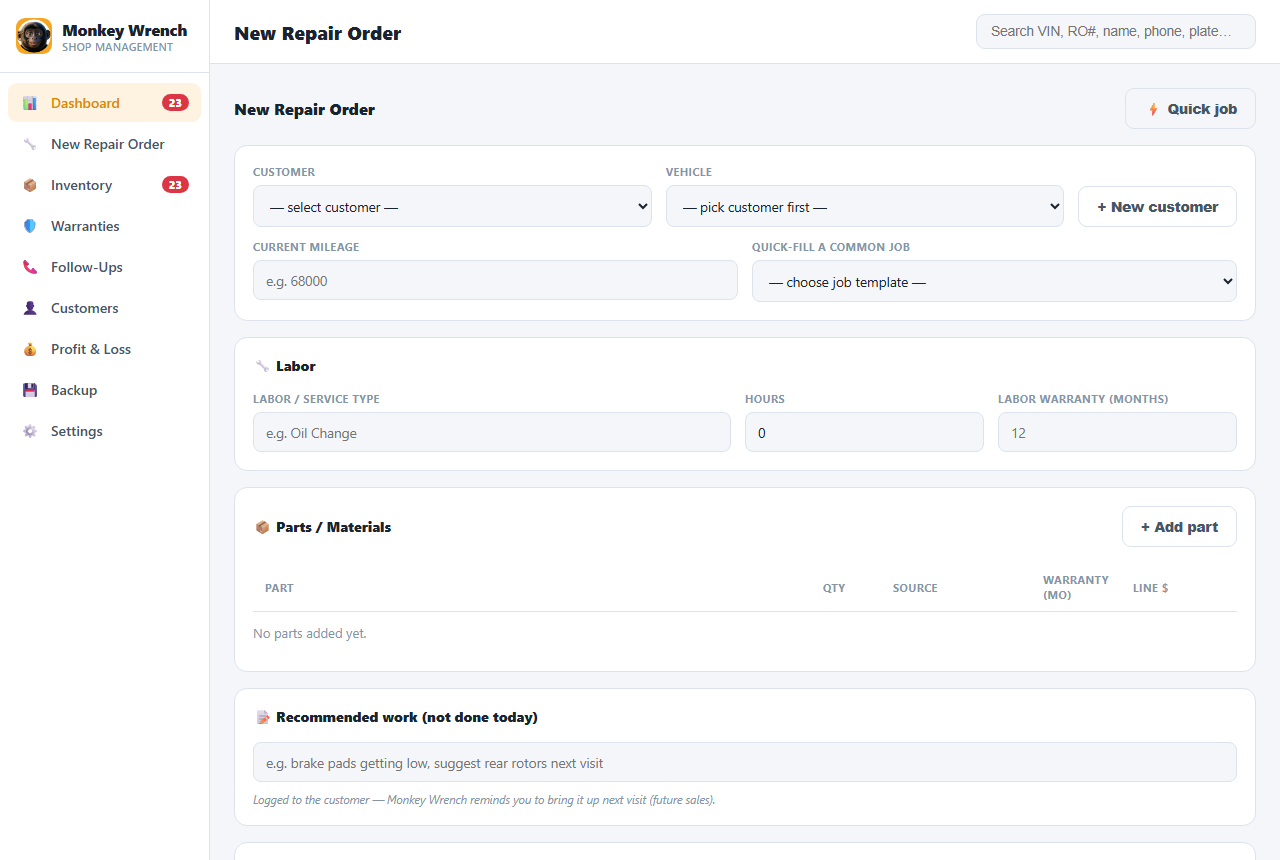
- Pick the customer and vehicle (or + New customer). The car's active warranties show right there as a short table, so you know if the work is covered.
- Type the customer's concern in their words (for example "grinding when braking"). It prints on the invoice.
- Choose a common job to add its labor line, parts, labor warranty and next-service reminder. Choose another to add that one too: a visit with three concerns is one repair order.
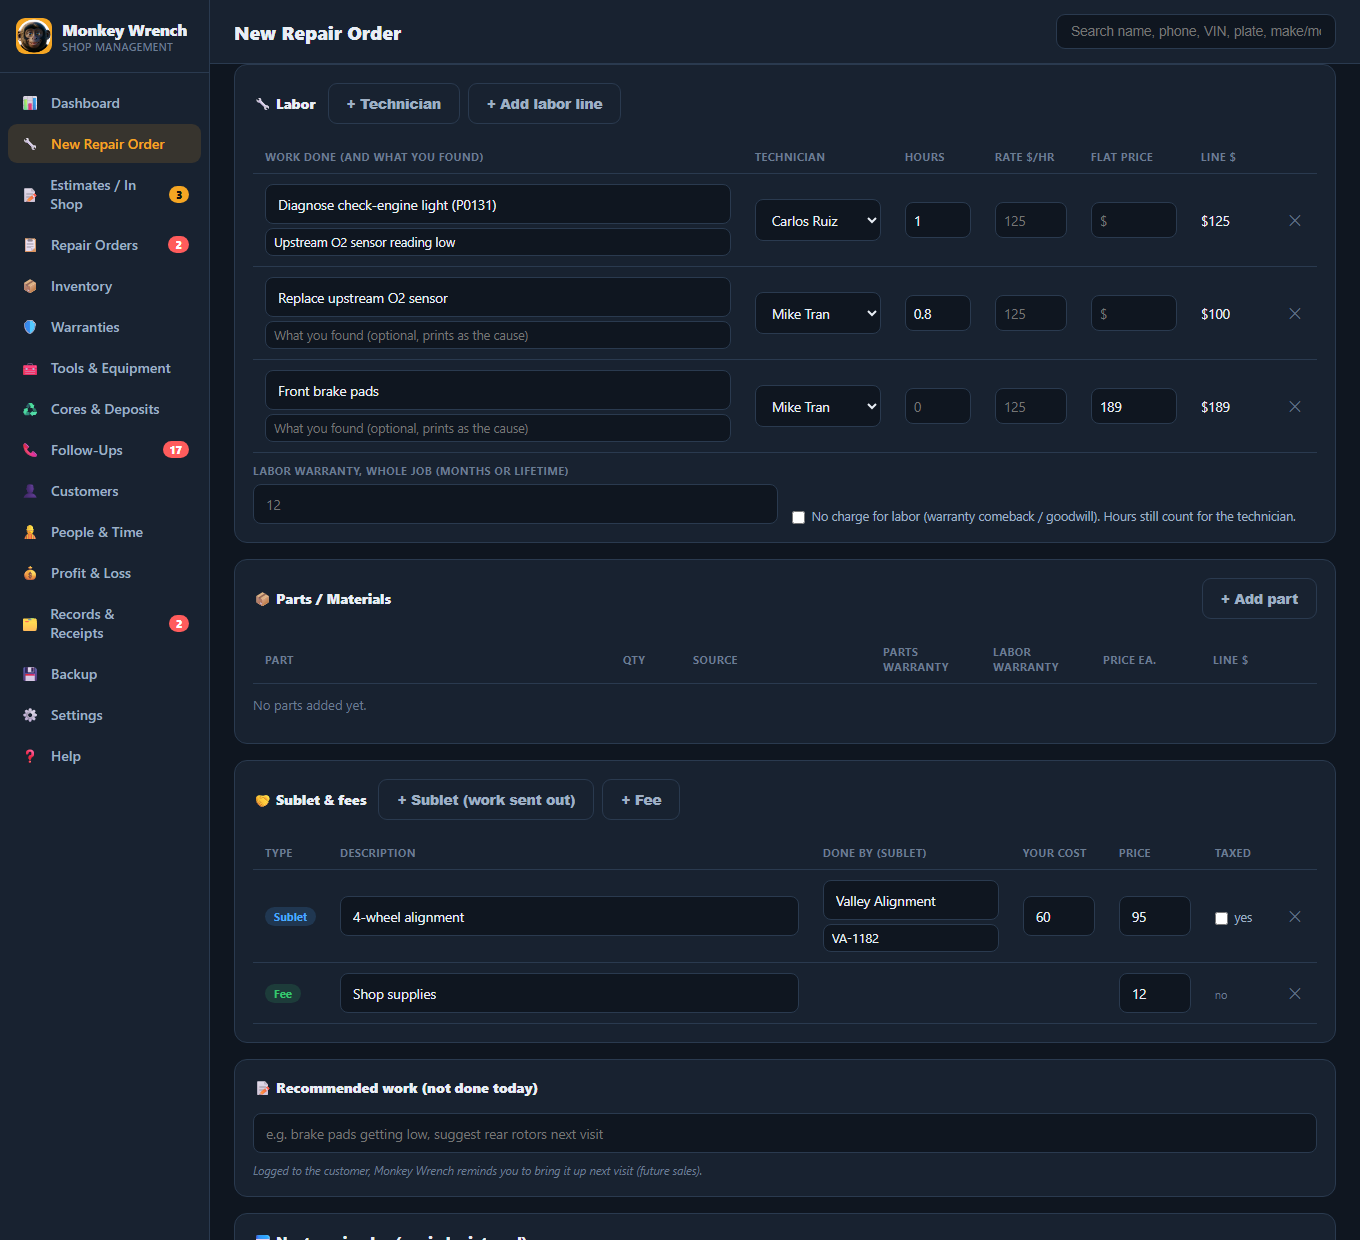
- Labor: one line per job, each with its own technician and hours. Leave the rate blank for your shop rate, type a different rate (a diagnostic rate, say), or type a flat price for the line. Under each line you can write what you found; it prints as the cause. Each tech's hours count for them in Profit & Loss and in flat-rate pay. + Add labor line adds another.
- For each part, pick where it came from: Shop (out of your own stock, so inventory goes down), Bought (bought at a parts store for this job; type what the store charged you), or Cust. (the customer brought it; no cost to you and no parts warranty from the shop). A part that isn't in your inventory? Pick + Type a part that isn't in Inventory and type its name. The price is your cost plus your markup; change it if you like. Your cost never prints on the customer's invoice.
- Under each part, pick New, Used, Rebuilt or Reconditioned; it prints on the estimate and invoice.
- Sublet & fees: + Sublet for work another shop does for this job (alignment, machine shop, tow): the description, who did it, their invoice #, what they charged you (never printed) and your price. + Fee for shop supplies or disposal. Sublet and fees go into your books as income, and what the other shop charged you as a cost.
- Warranty comeback or goodwill job? Tick No charge for labor. The hours still count for the technician.
- Click 🧾 on a part for the parts store receipt: store, receipt #, date, part #, core charge, and a photo of the receipt. The store honors the parts warranty with it.
- If the customer left a deposit for this vehicle, it is ticked for you. Only the amount of this bill is used; anything left stays on file for them.
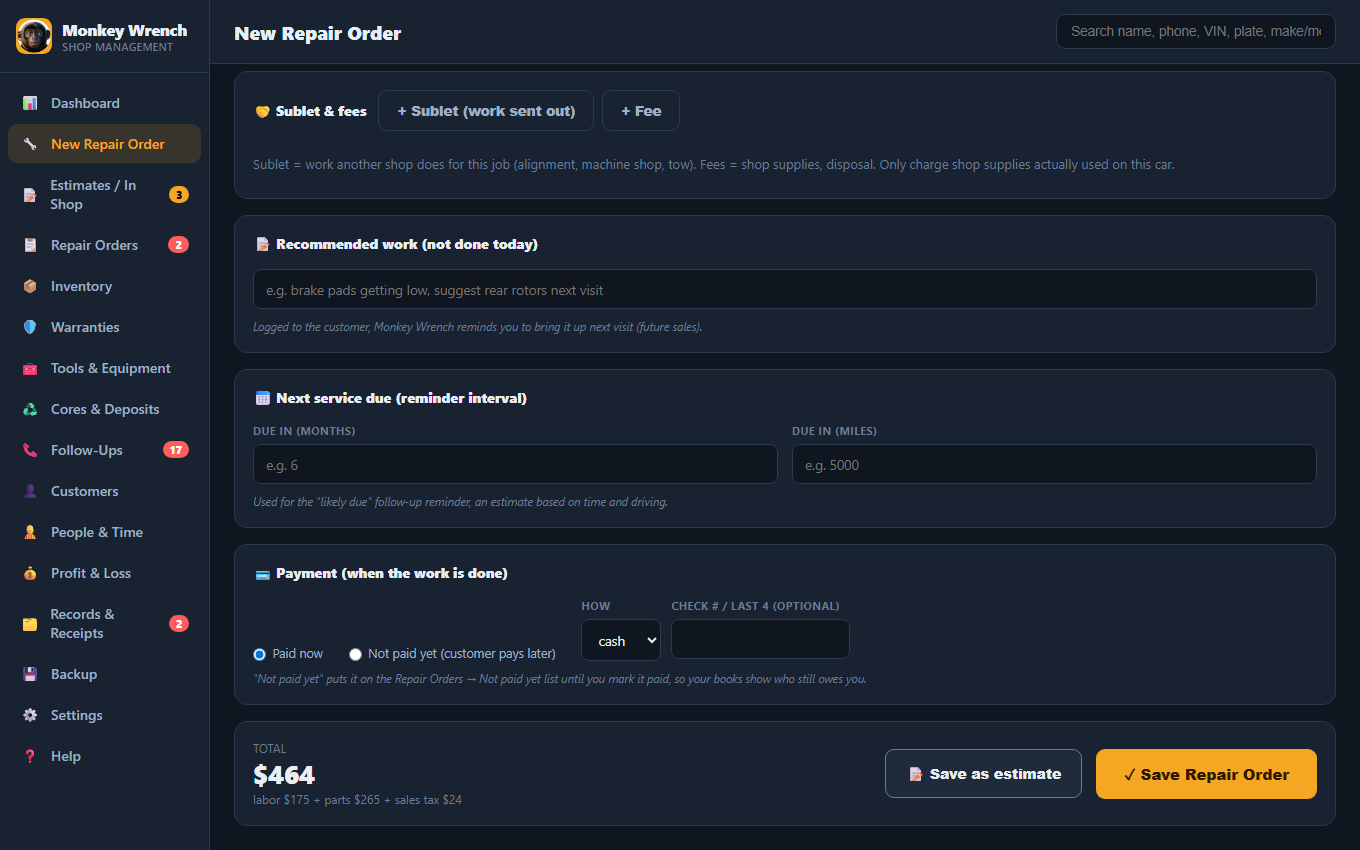
- Payment: Paid now (cash, card or check, with the check # or last 4) or Not paid yet for a customer who pays later, like a fleet account.
- Add recommended work they declined; it comes back as a follow-up.
- Save, then print the invoice. Clicking Save twice by accident only makes one repair order.
If sales tax is turned on in Settings, the total includes it (parts only, unless you also tax labor or fees; tick Taxed on a sublet line that is taxable in your state).
Same-part comeback warning
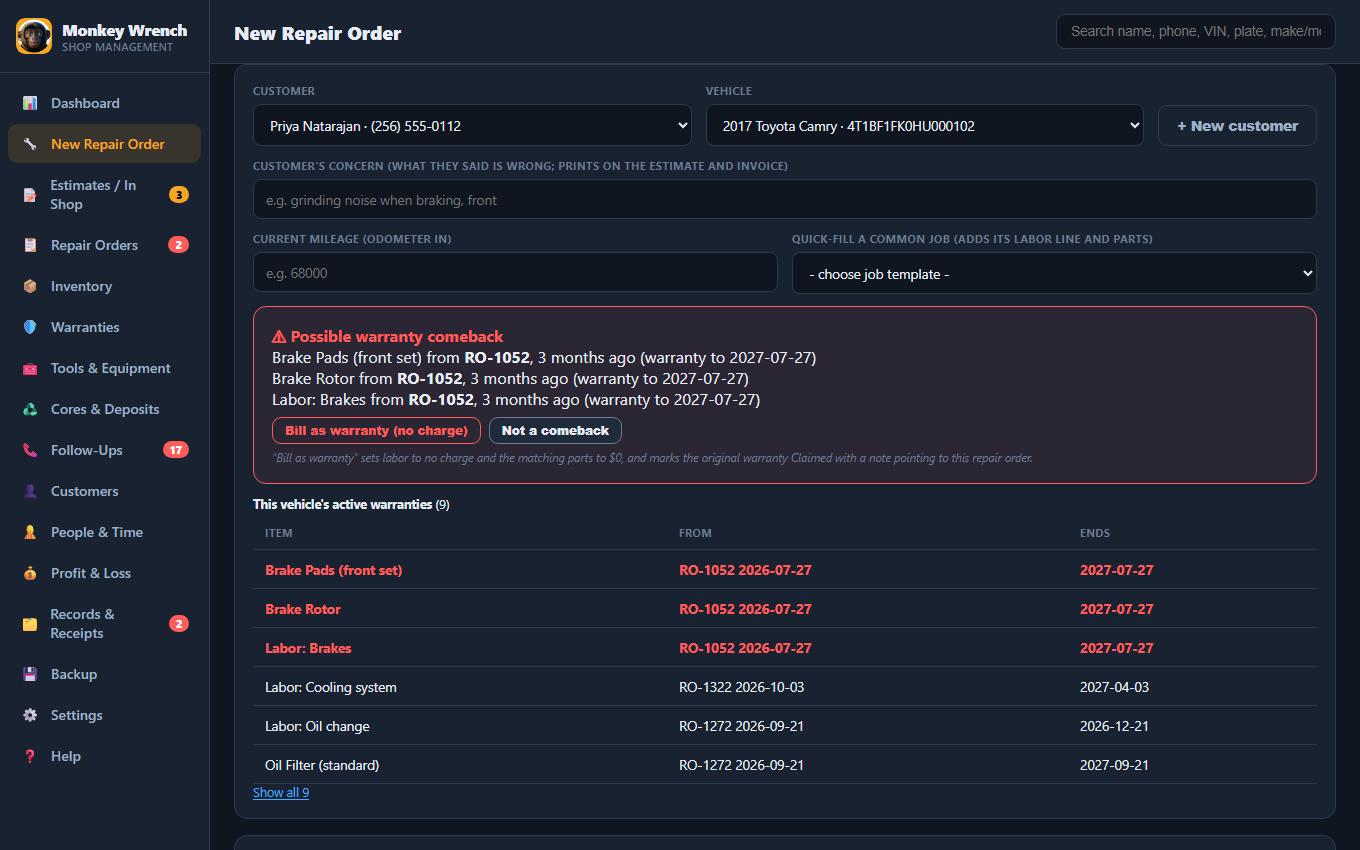
When a part or job on the new repair order matches something still under warranty on that car (the same part, or the same kind of work), a red box says so: which repair order, how long ago, and when the warranty ends. That warranty is highlighted in the car's warranty table.
- Bill as warranty (no charge): labor goes to no charge, the matching parts to $0, and when you save, the original warranty is marked Claimed with a note pointing to the new repair order. The invoice says "Warranty comeback of RO-…".
- Not a comeback: hide the warning and carry on.
- Routine repeats aren't flagged: oil, filters and fluids, short labor warranties (6 months or less) and scheduled maintenance that has a next-due interval.
The Repair Orders list: unpaid, void and reprint
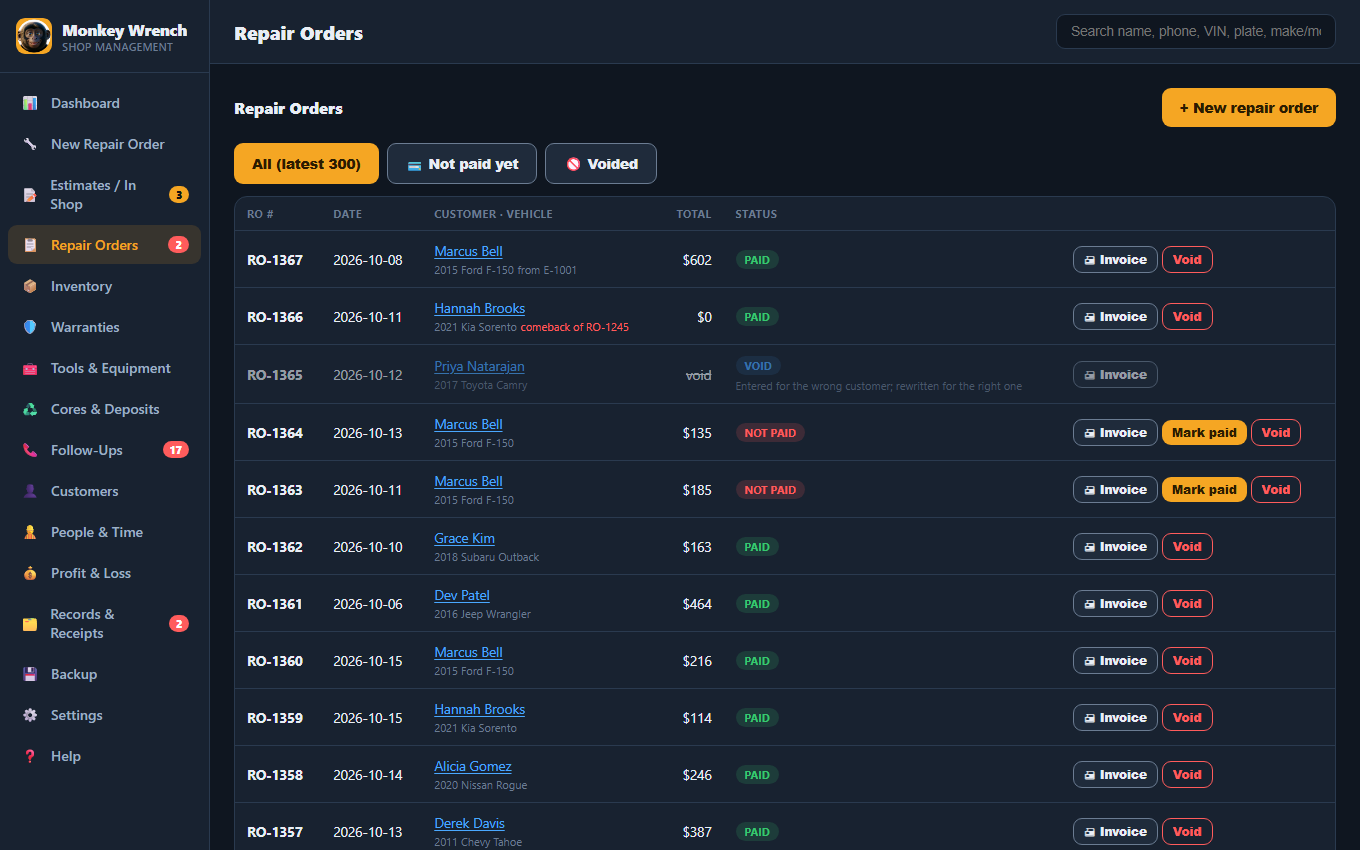
- Not paid yet lists everyone who still owes you. When they pay, click Mark paid and enter the date and how.
- A saved repair order can't be edited or deleted, so your records stay trustworthy. If one is wrong (wrong customer, entered twice), click Void and type the reason. It keeps its number and shows as VOID, parts from your stock go back on the shelf, a deposit used on it goes back on file, and its warranties end. Then write a new one.
3. Estimates & the customer's OK
Write the car up when it comes in, get the customer's OK, do the work, then turn it into the repair order. Laid out after California's "Write It Right" rules for repair shops (checked Oct 2026); check your own state's rules.
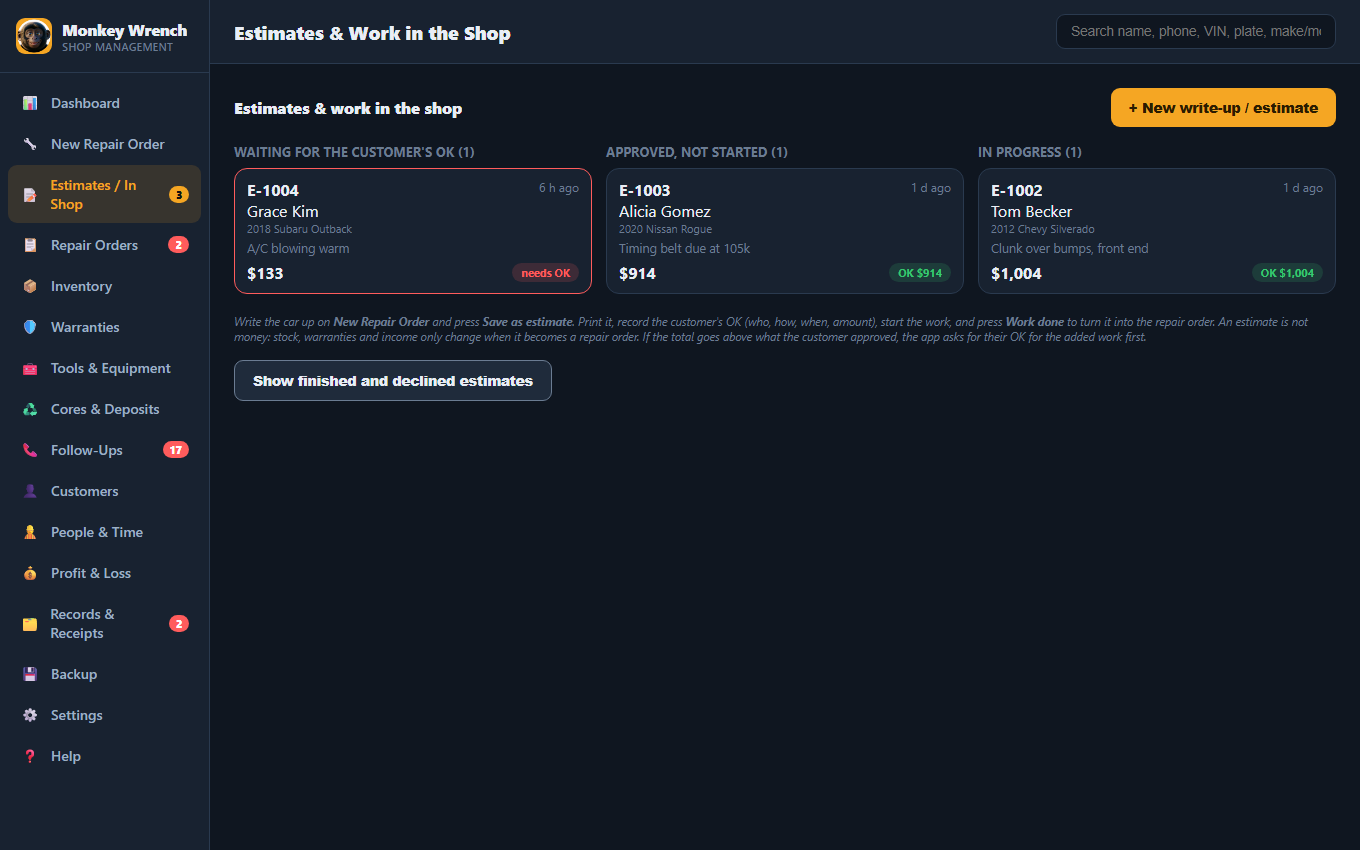
- On New Repair Order, fill in the customer, vehicle, concern, odometer in and the work (labor lines, parts, sublet, fees), then press 📝 Save as estimate. It gets a number like E-1004. Nothing is counted yet: no stock comes off the shelf, no income, no warranties.
- 🖨 Print estimate for the customer. It lists each part (new, used, rebuilt or reconditioned) and its price, the labor, sublet and fees, the estimated price before sales tax, the odometer reading, a signature line, and the question "Do you want your replaced parts back?".
- ✍ Record customer's OK: how they said yes (signed in person, phone, text or email), their name, the phone number or email used, the date and time, the amount approved, and whether they want the replaced parts back. The OK is kept permanently; it can't be changed or deleted.
- ▶ Start work moves it to In progress. The app won't start work that nobody approved.
- Found more? Add it to the estimate. If the total goes above what they approved, the estimate turns red and the app won't make the repair order until you record their OK for the added work (what was added, and the new total).
- When the job is done, choose the payment and press ✓ Work done: make the Repair Order. It becomes a normal repair order (stock, warranties, income), and the invoice shows every OK: who, how, when, the amount, and the added work.
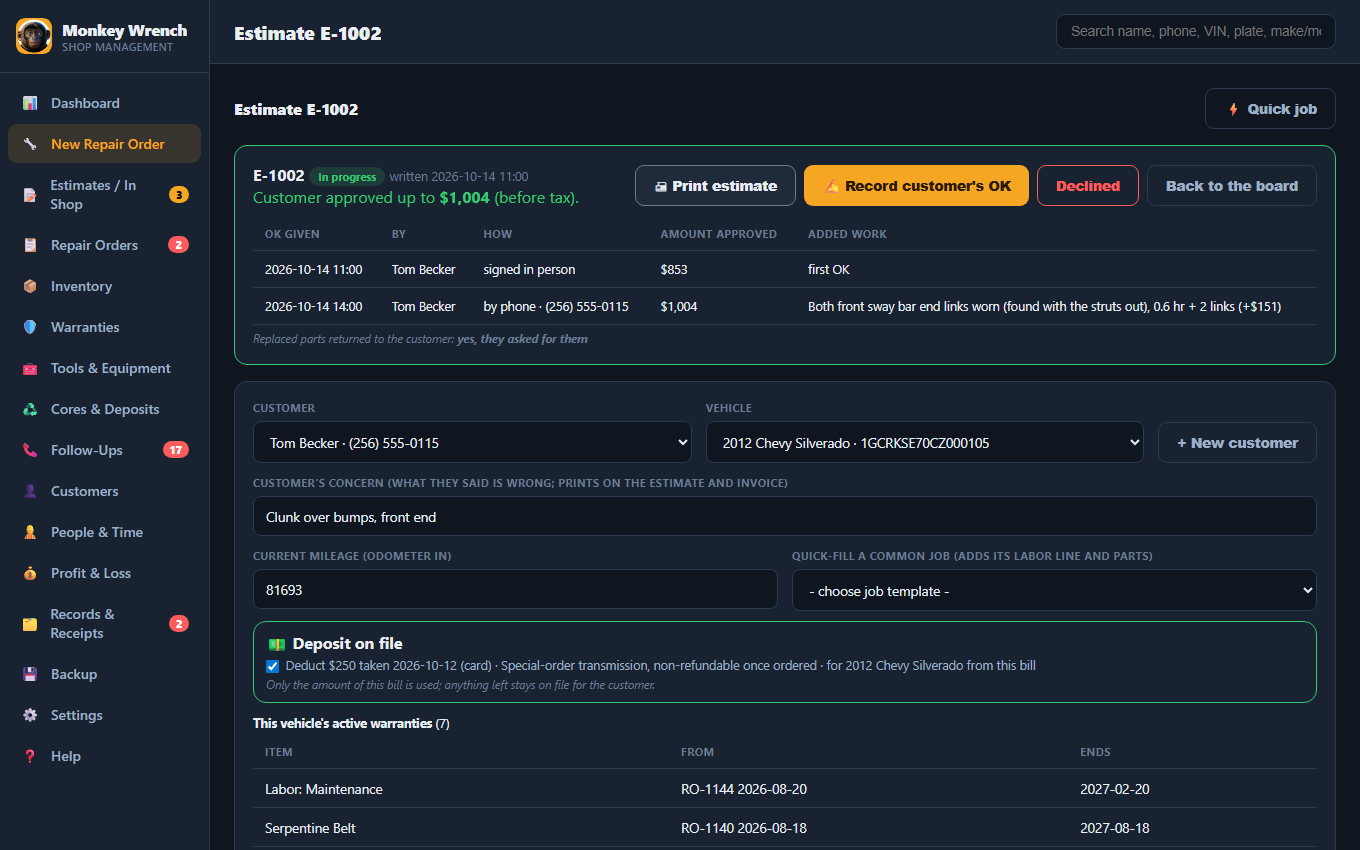
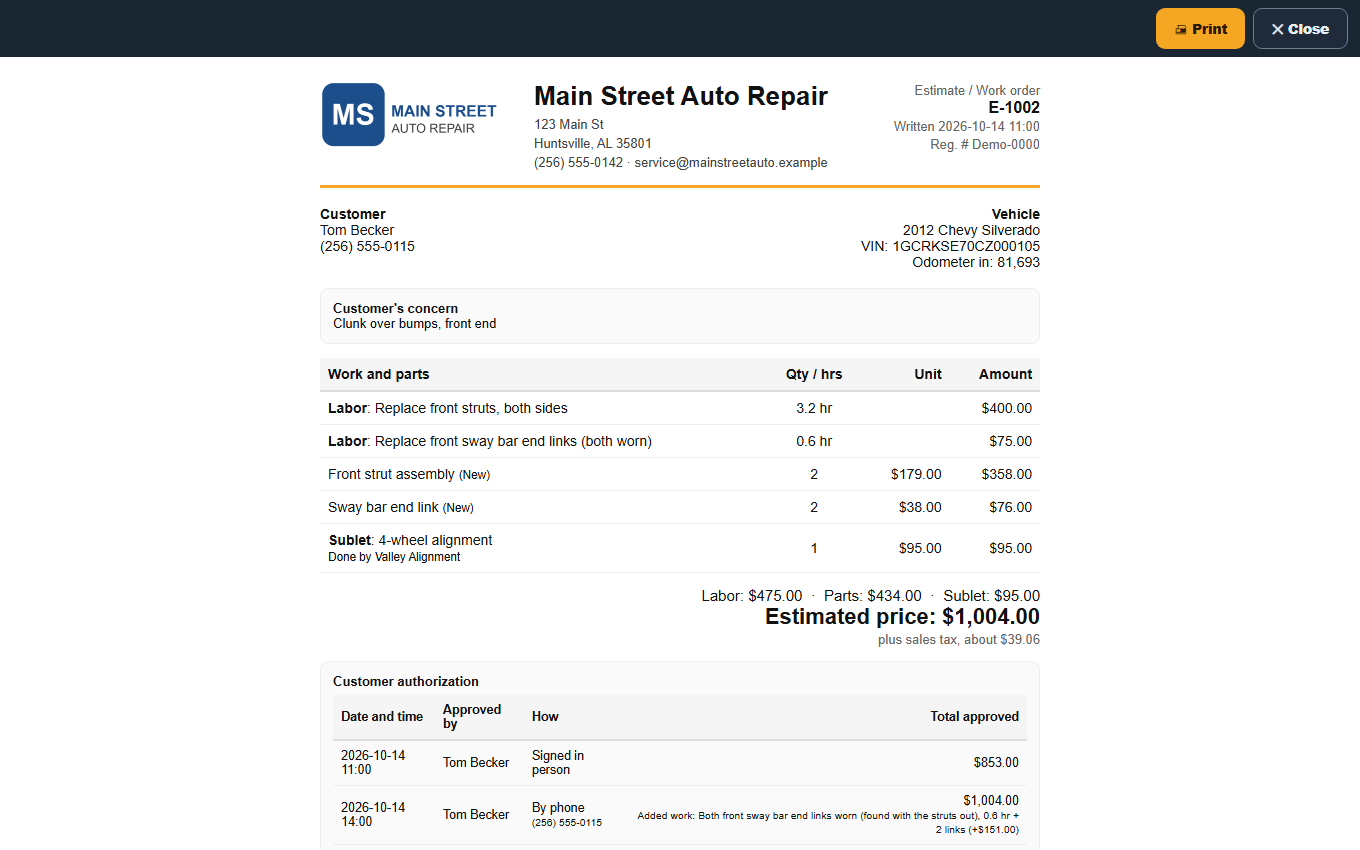
Customer said no? Press Declined; you can reopen it later. Click any card on the board to open it again. Finished and declined estimates are under Show finished and declined estimates.
4. Invoices
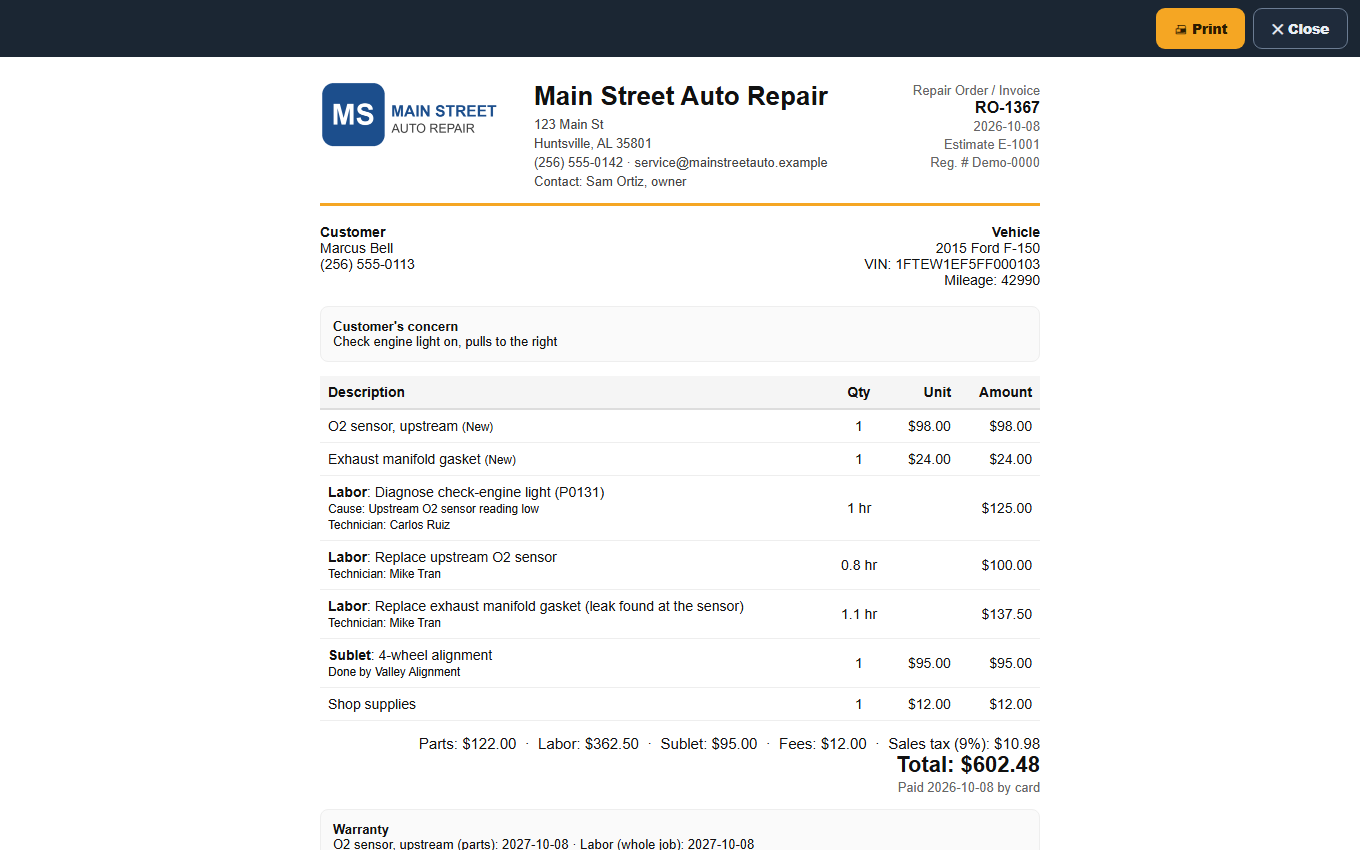
Print any invoice right after saving, or later from the Repair Orders list or the customer's page (🖨 Invoice). It shows the customer's name, address, phone and email, the vehicle and VIN, the customer's concern, each part (new, used, rebuilt or reconditioned), each labor line with its technician and what was found, sublet and fees, sales tax, the total, any deposit deducted and the balance, whether it's paid (and how) or not paid yet, warranty end dates, your warranty terms, the estimated next service, and a line for the customer's signature. Your shop registration or license number prints at the top if you add it in Settings. A repair order made from an estimate also shows the estimate number, every customer OK (who, how, when, amount, added work) and whether the replaced parts were returned. A hazardous-waste or disposal fee prints with your EPA ID number if you add it in Settings.
🔒 Shop copy is for you only: your cost, markup, parts store and receipt numbers, and any core refund still owed.
Set up what prints in Settings → Your business on invoices, then click Preview an invoice.
5. The dashboard
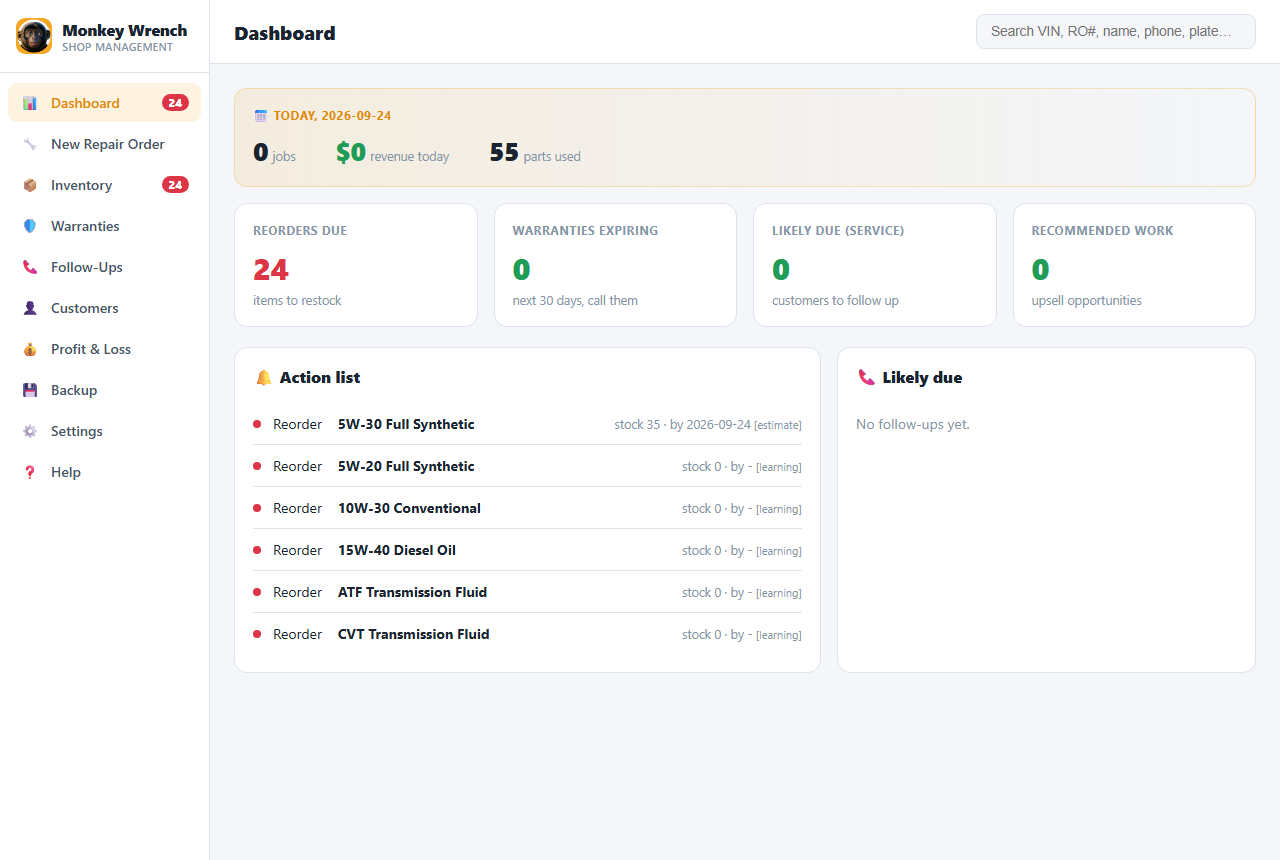
- Today: jobs, revenue and parts used.
- Reorders due, warranties expiring, likely due for service, recommended work.
- Cores to return and open deposits: money waiting for you or owed back.
- The action list puts it in order. The red numbers in the menu show the same counts.
6. Customers & search
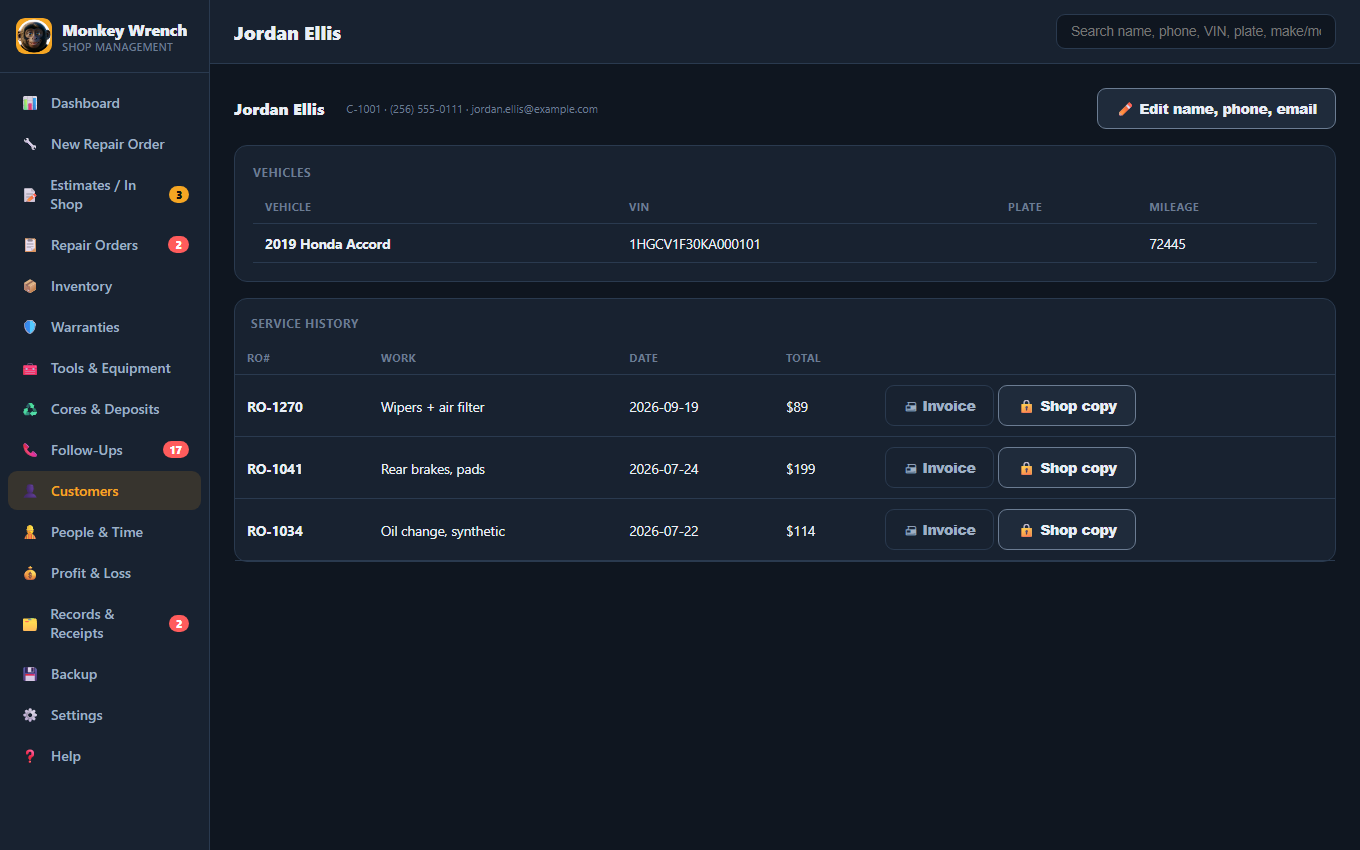
Type in the search box at the top of any screen: name, phone (any format), email, VIN, plate, the car's year, make or model ("Silverado", "2016 Jeep"), the work done ("brakes", "O2 sensor"), an RO # or an estimate #. Type more than one word to narrow it down; the words can be in any order. Results appear as you type (press Enter for short words).
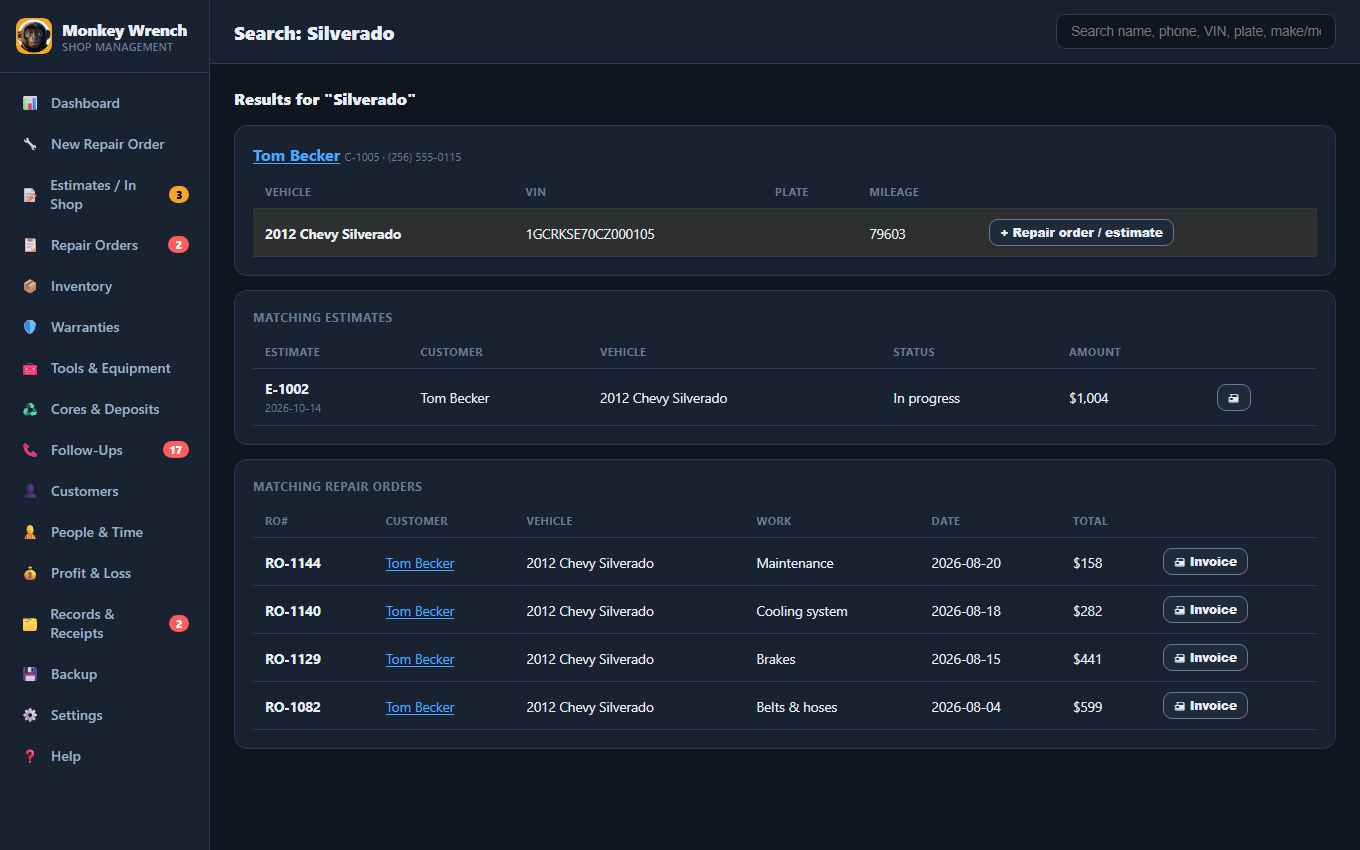
Click a repair order to open its invoice, an estimate to open it, a name to open the customer, or + Repair order / estimate next to a car to start one for that car. Use ✏️ Edit name, phone, email to add their address and email so they print on the invoice.
7. Inventory & reordering
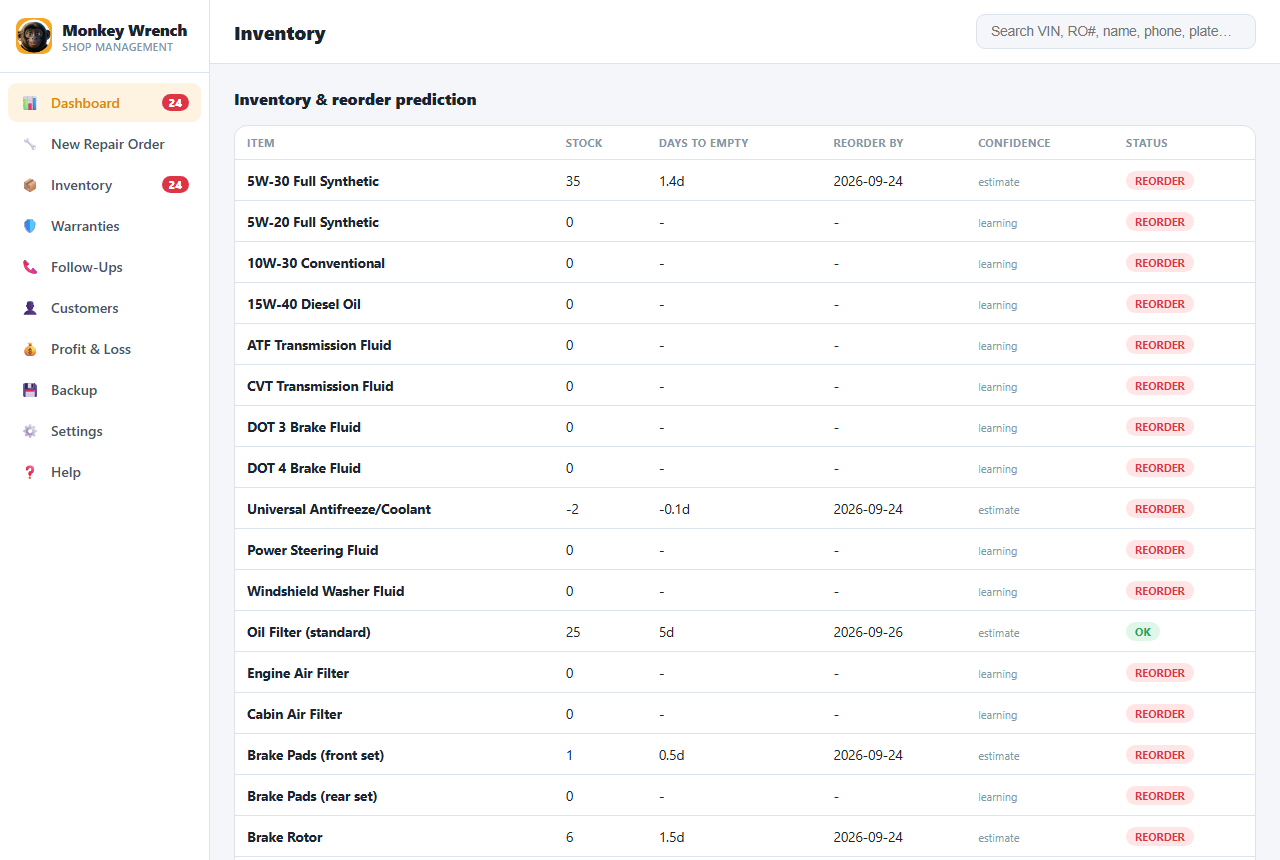
- + Add item for anything not on the list. Click any item to change its price, reorder level, count what's on the shelf, or remove it.
- Receive stock when parts come in. Buy in containers (cases, 5-gal pails, 55-gal drums, totes, bulk tanks) and use by the quart, liter or each; the app works out the cost per unit.
- Standard or metric for the shop, and per item if you need it. Refrigerant: R-134a (most cars before about 2015) and R-1234yf (most newer cars).
- Fixing a count is an adjustment, so it doesn't throw off the reorder prediction.
8. Warranties
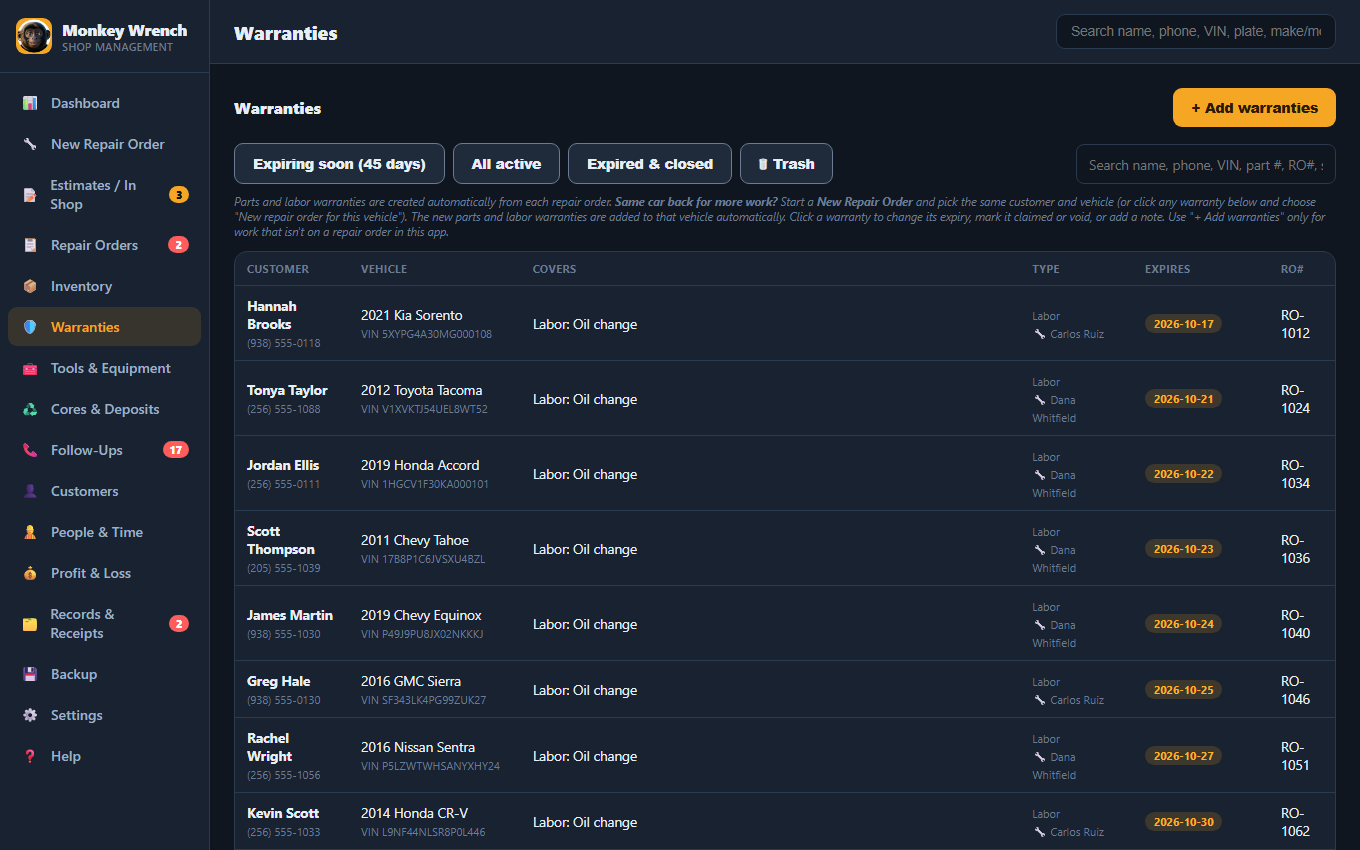
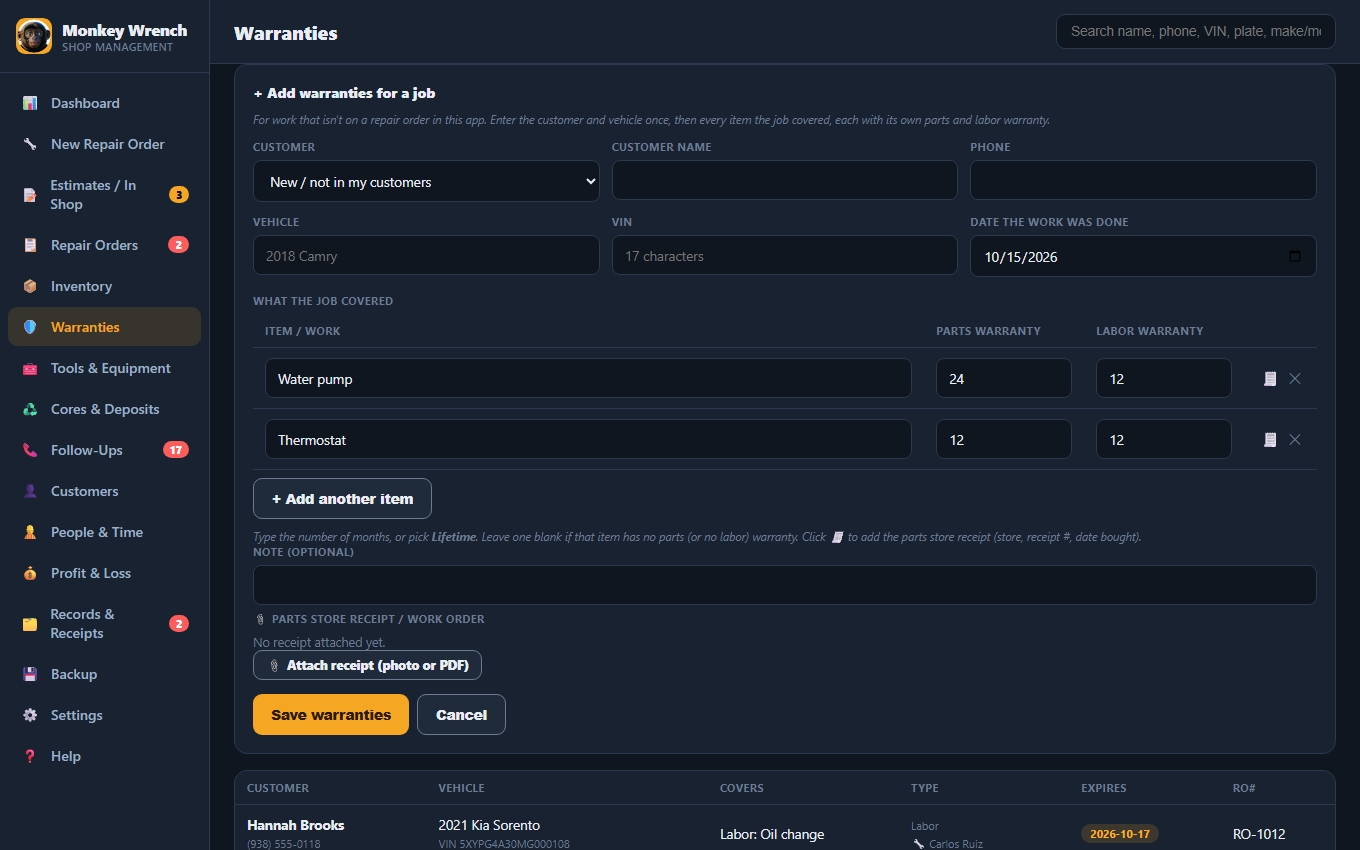
Warranties are created from each repair order: each part has its own parts warranty, and labor has its own (months or Lifetime). Click one to change the expiry, mark it claimed or void, or add a note. If the car came back and the work was redone, choose "Work redone" and it points to the newer repair order. Deleted warranties go to this app's own Trash, where you can restore them.
9. Cores & deposits
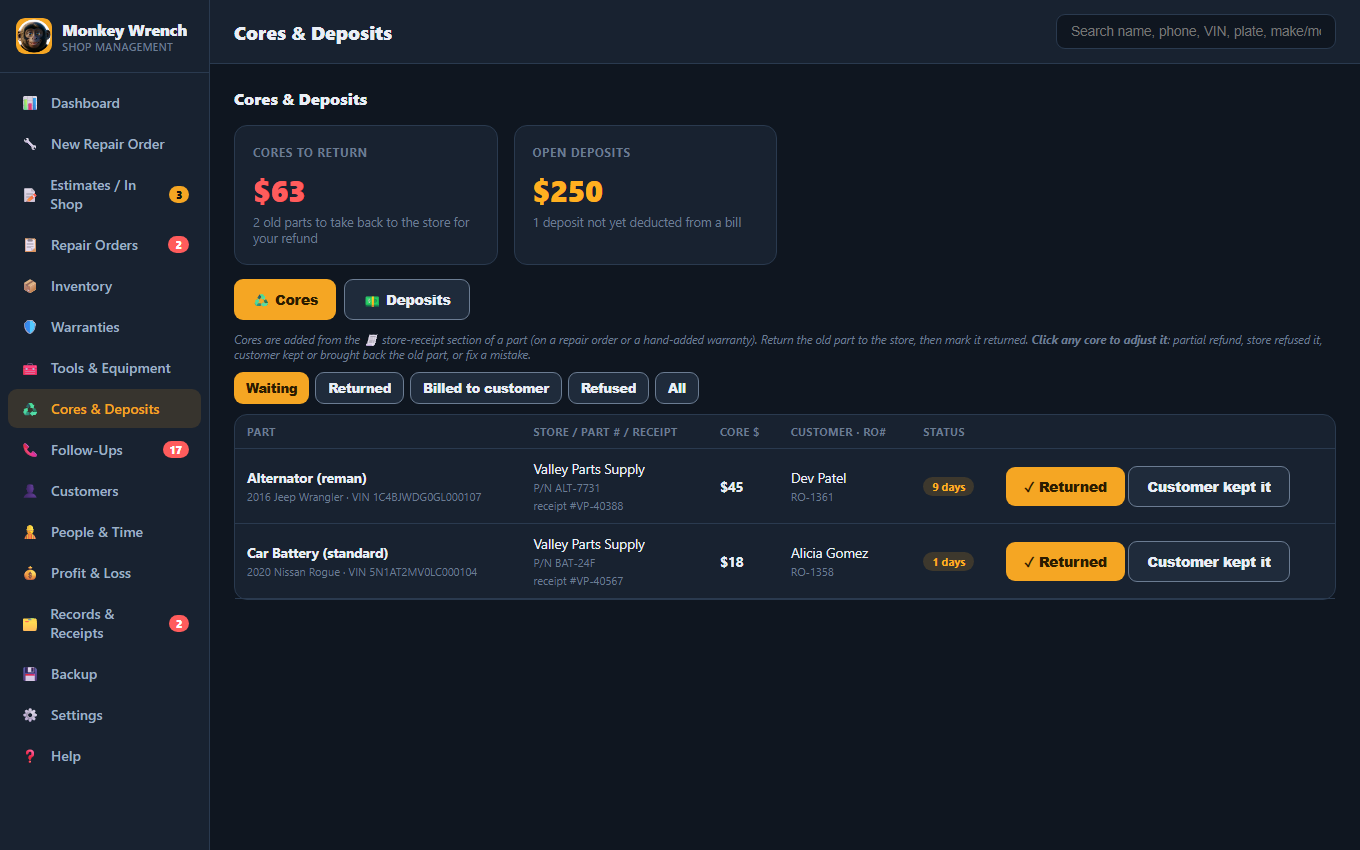
Cores come from the receipt section of a part. When you return the old part, click ✓ Returned. If the customer kept it, click Customer kept it. Click a core to record a partial refund or a refused core; those count as a core loss in Profit & Loss.
Deposits: take a deposit for a big job, such as a special-order part. Pick the customer and the vehicle, and say what it's for (attach the signed paper if you like). The next repair order for that vehicle offers it with "Deduct from this bill". Only the bill's amount is used; anything left stays on file. If the customer cancels, click Refunded when you give it back, or Kept when it was non-refundable (a kept deposit counts as income).
10. Follow-ups
11. Tools & equipment
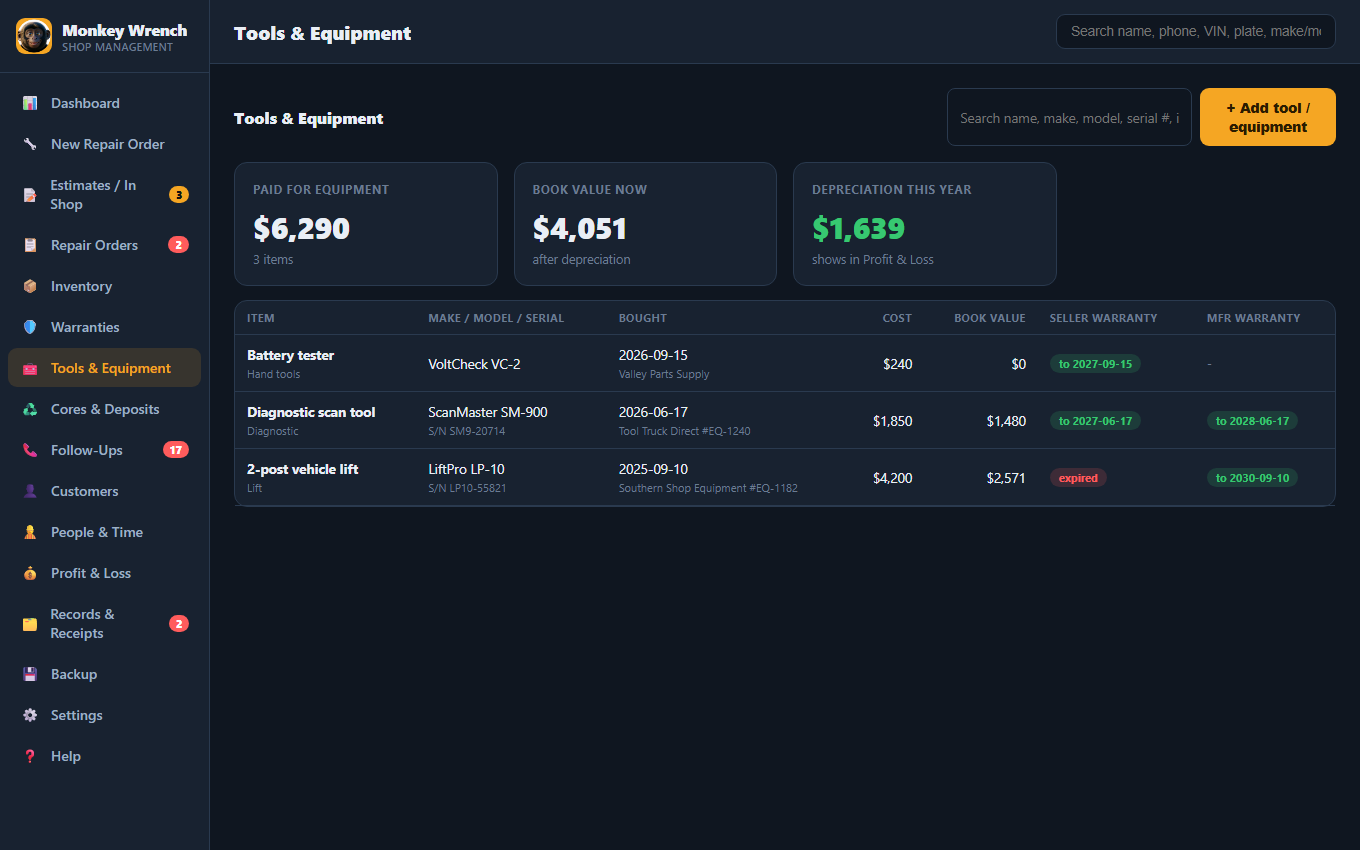
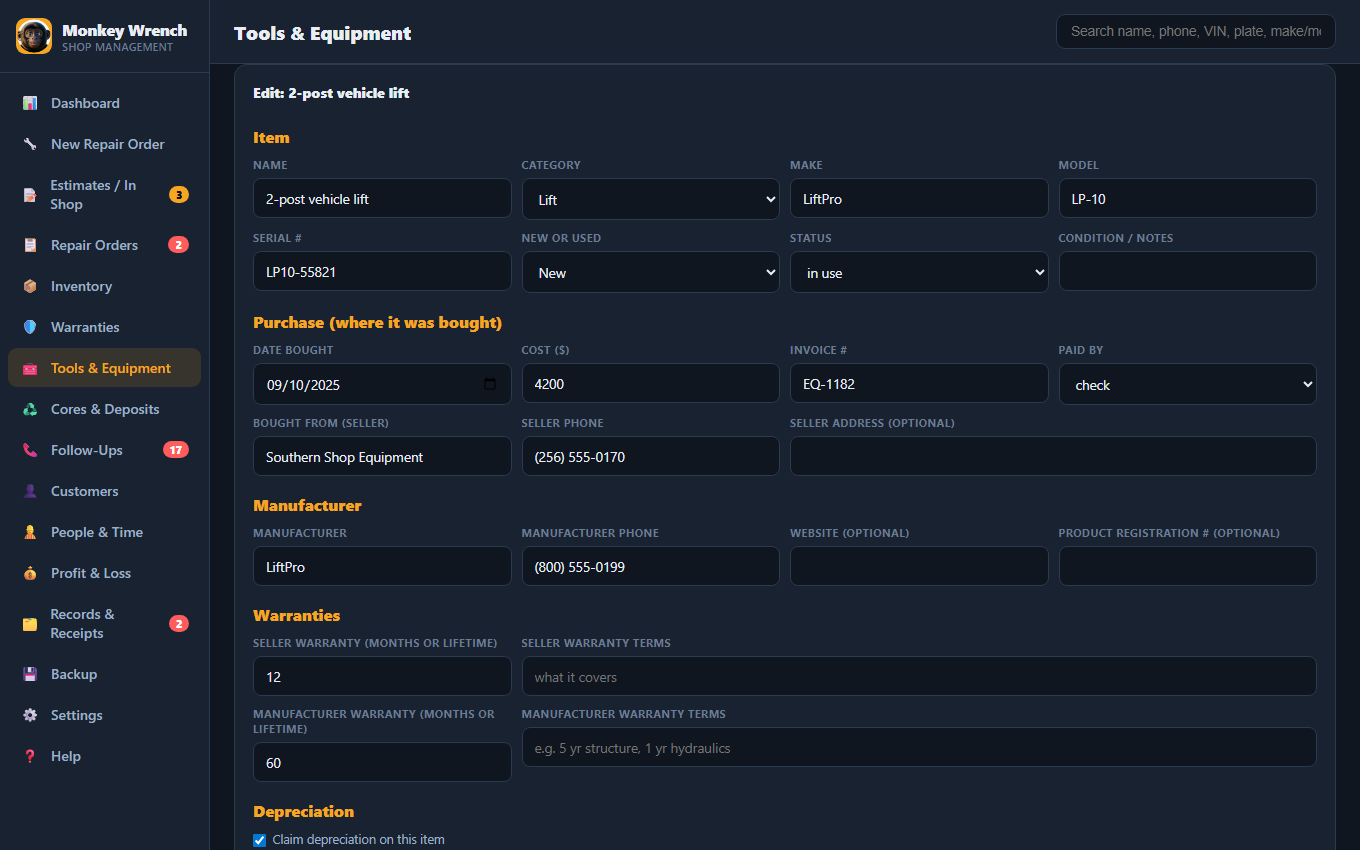
Add lifts, scan tools and other equipment with the make, model, serial #, where you bought it, invoice #, the seller's and manufacturer's warranties, and the receipt and manuals attached. Turn on depreciation and pick the method: straight-line, declining balance, MACRS 5 or 7 year, or Section 179. Depreciation shows in Profit & Loss. Ask your accountant which method to use.
12. People & time clock
Everyone you pay: mechanics, service writers, helpers, detailers, office staff, 1099 contractors and subcontractor businesses.
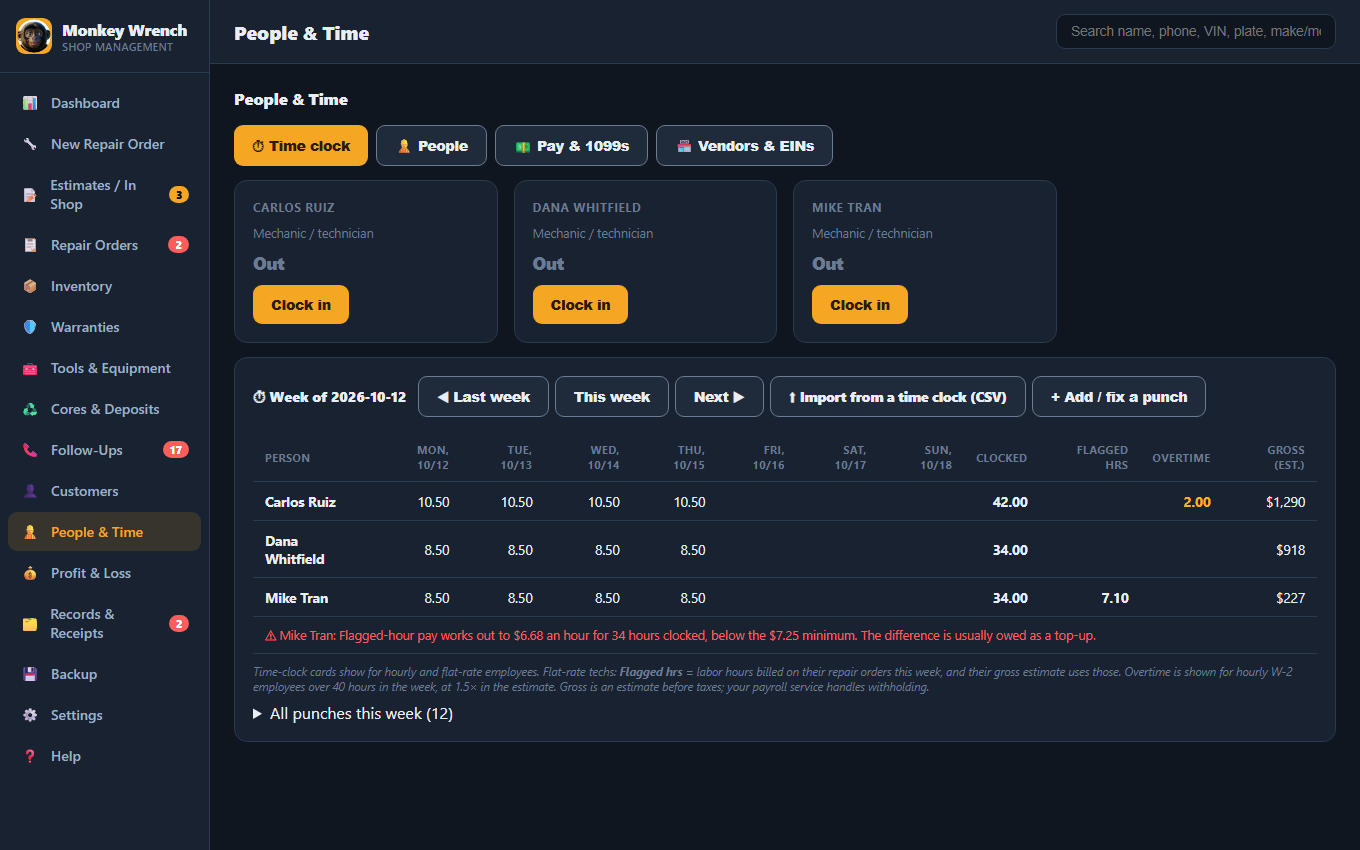
- People: name, job, type (W-2 employee, 1099 contractor, subcontractor business), how they're paid (hourly, flat rate, salary, per job), rate, SSN or EIN, W-9 on file, contact, start and end dates. Attach their W-9, contract or insurance certificate.
- Time clock: hourly and flat-rate employees clock in and out with one click. Using an electronic time clock? Export its punches as a CSV (name, date, in, out) and use Import from a time clock. Fix a missed punch with Add / fix a punch; fixes are marked "edited".
- Flat-rate techs: the week shows their flagged hours (labor hours billed on their repair orders) and an estimate of their pay from those. If that pay works out below the minimum wage for the hours they clocked, a warning shows under their name (set your state's minimum in Settings).
- Overtime shows for hourly W-2 employees over 40 hours in a week. Pay amounts here are estimates; your payroll service handles withholding.
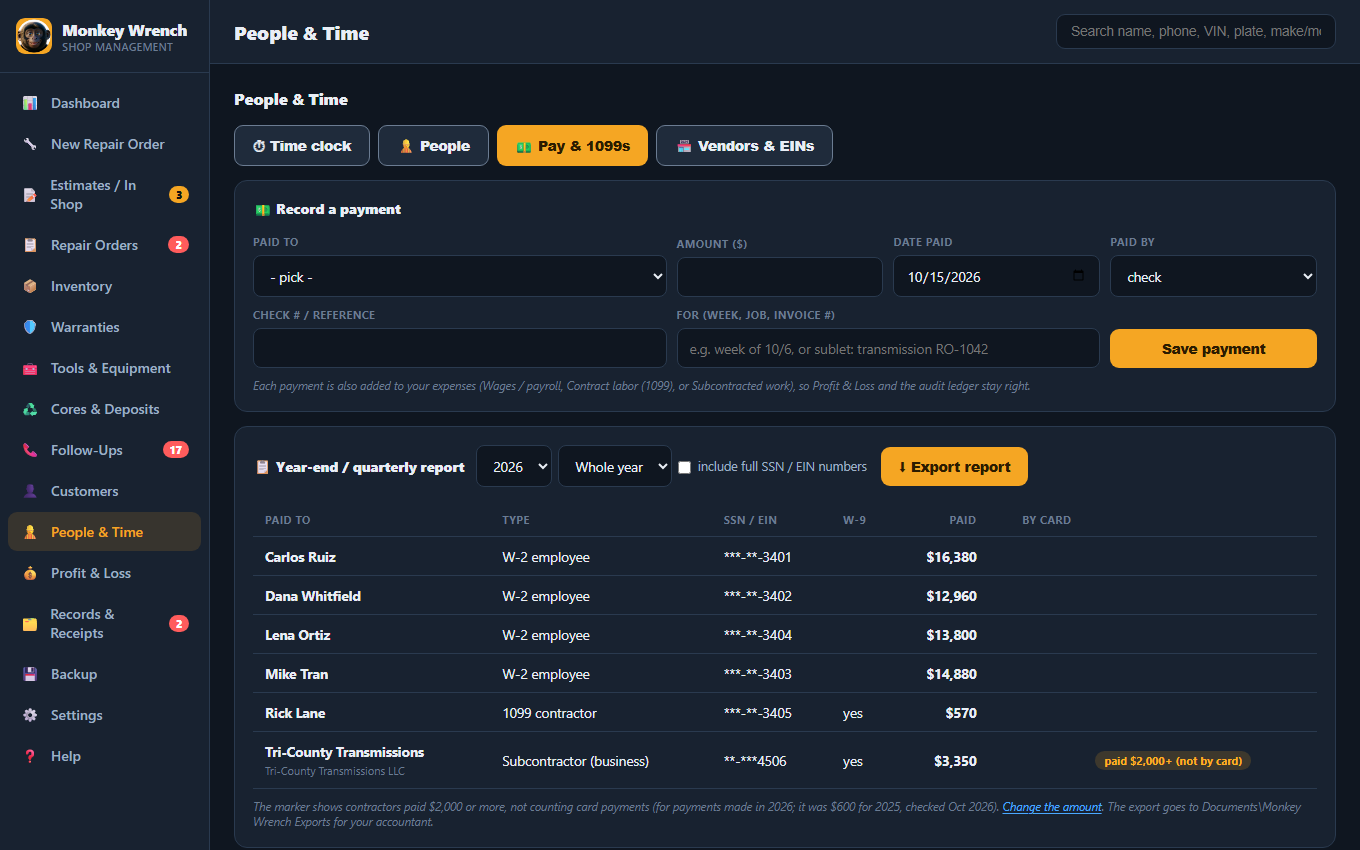
Pay & 1099s: record each payment (it's also added to your expenses). The year-end or quarterly report totals what you paid each person and marks contractors paid $2,000 or more, not counting card payments (the amount for payments made in 2026; it was $600 for 2025, checked October 2026; you can change it). The totals come straight from your expenses, so editing or deleting a payment updates them, and contractor pay entered on the Expenses screen counts too. Export it for your accountant, with the SSN and EIN numbers masked, or in full if you tick the box.
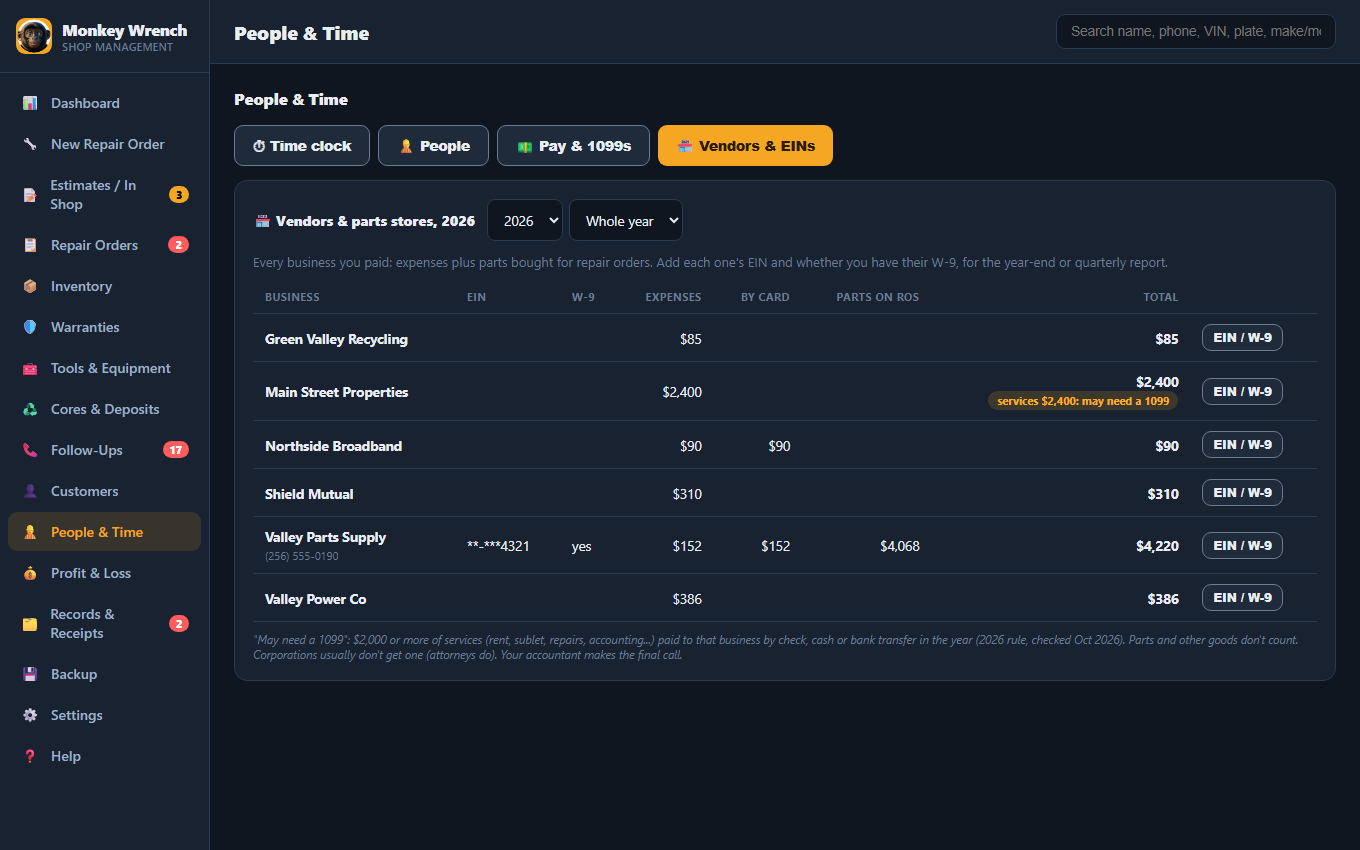
Businesses you paid $2,000 or more for services (rent, sublet, repairs, accounting) by check, cash or bank transfer are marked "may need a 1099". Parts don't count. Your accountant makes the final call.
13. Profit & Loss and expenses
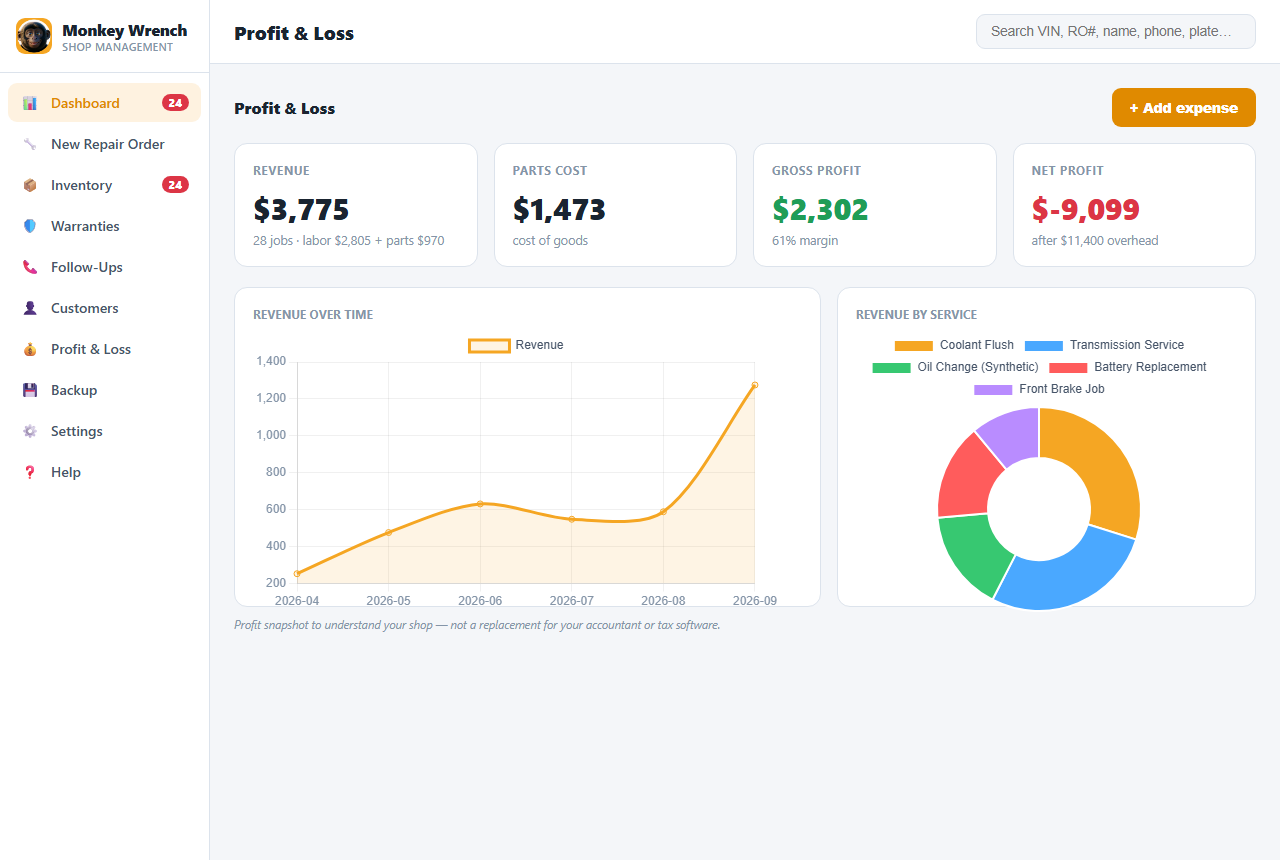
Pick the period at the top: this month, last month, this year, last year, all time, or your own dates. The numbers come from the same books as the audit ledger, so they always match what your accountant gets.
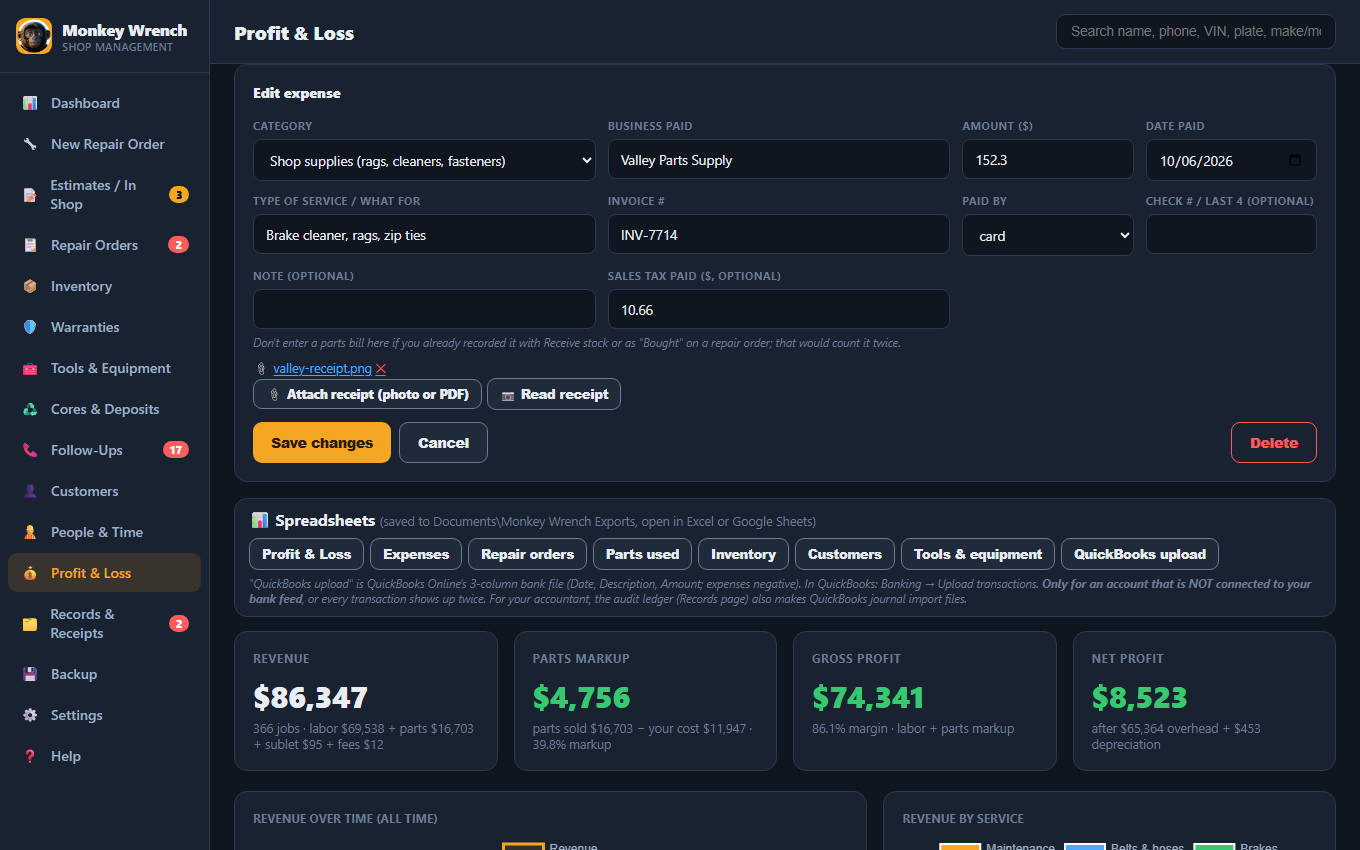
Revenue, parts cost and markup come from your repair orders, plus sublet work you billed (less what the other shop charged you) and shop fees. Labor by technician counts each labor line for the tech who did it. Sales tax you collect is shown separately: it isn't income, it's owed to the state. Add overhead with + Add expense: pick a category (rent, utilities, oil pickup, insurance, wages and more), the business paid, invoice #, date paid, how you paid, and sales tax paid.
Some money going out isn't an expense: Owner draw (money you take for yourself), Loan principal (paying down a loan) and Sales tax paid to the state. Pick those categories and they stay off your profit. A note under some categories explains what belongs there (for example, only the interest part of a loan payment is an expense).
If a photo looks blurry, dark or too small, the app tells you right away so you can retake it.
📊 Spreadsheets save Profit & Loss, expenses, repair orders, parts used, inventory, customers, and tools & equipment to Documents\Monkey Wrench Exports (open them in Excel or Google Sheets). QuickBooks upload is the 3-column bank file QuickBooks Online accepts; only use it for an account that isn't connected to your bank feed, or transactions show up twice.
14. Records & receipts
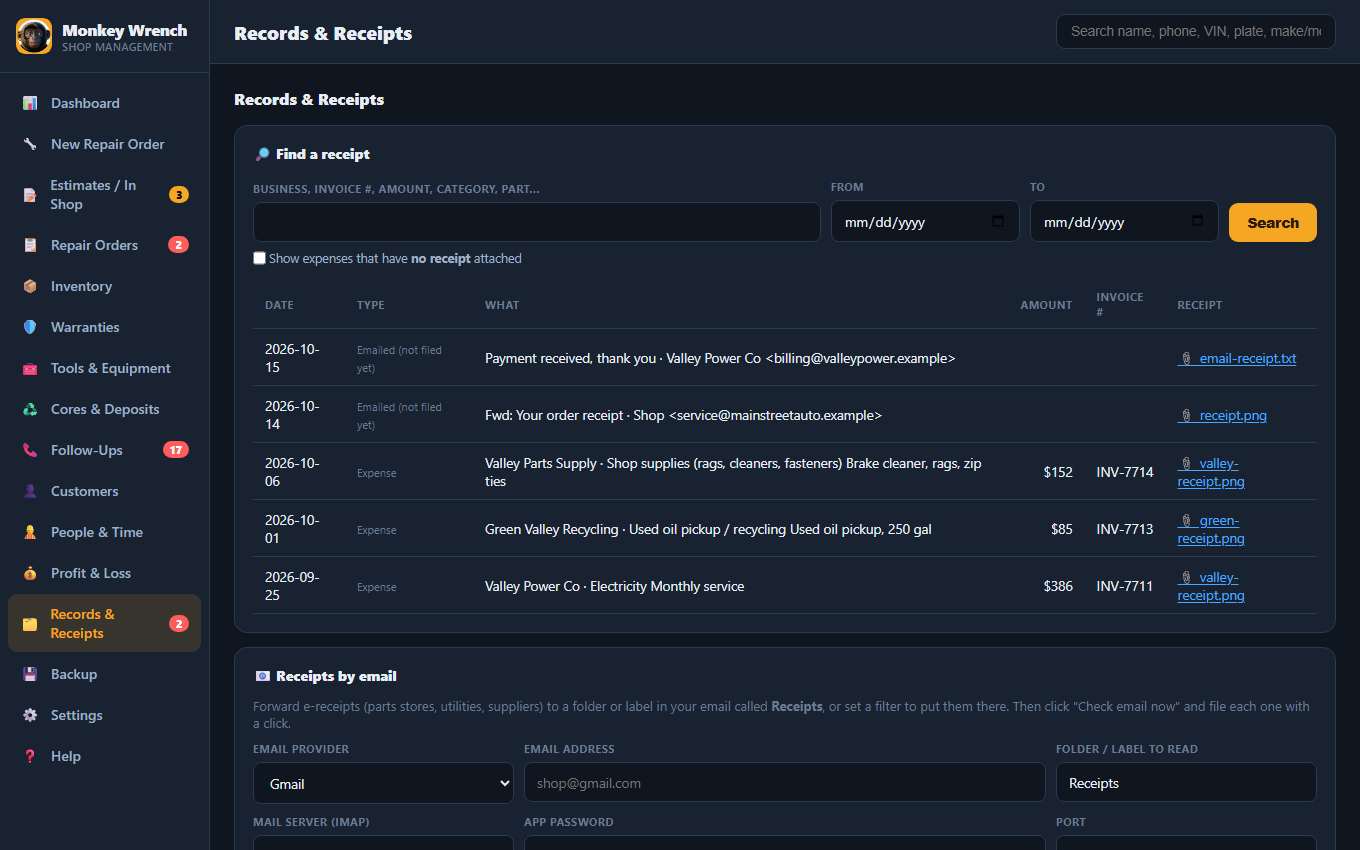
Receipts by email
Forward e-receipts (parts stores, utilities, suppliers) to a folder or label in your email called Receipts. In Receipts by email, enter your email account once (most providers need an app password, made in your email account's security settings), then click Check email now. Each receipt is read and listed; Make it an expense fills the expense in with the receipt attached. The app only reads that one folder and never changes or deletes your email.
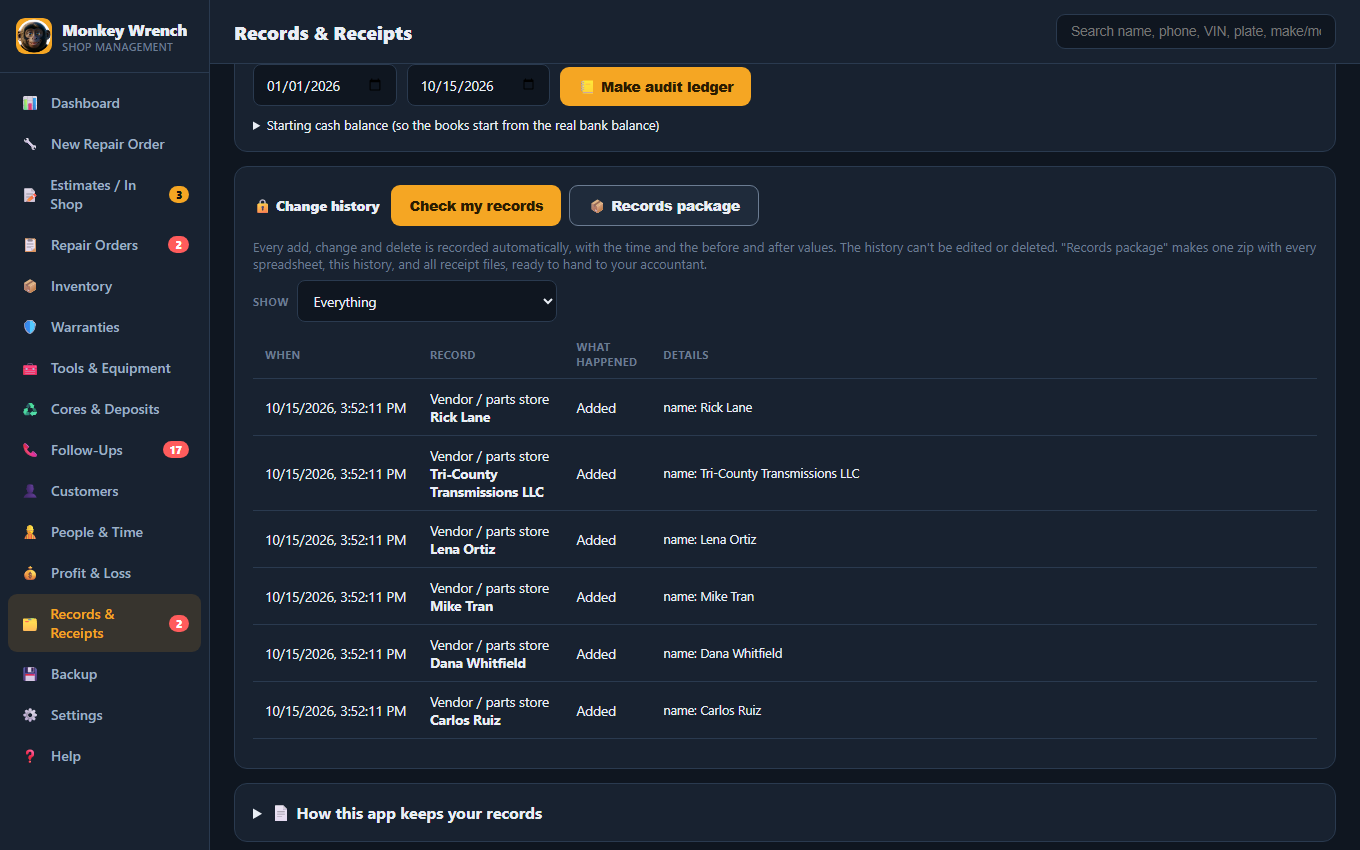
Change history
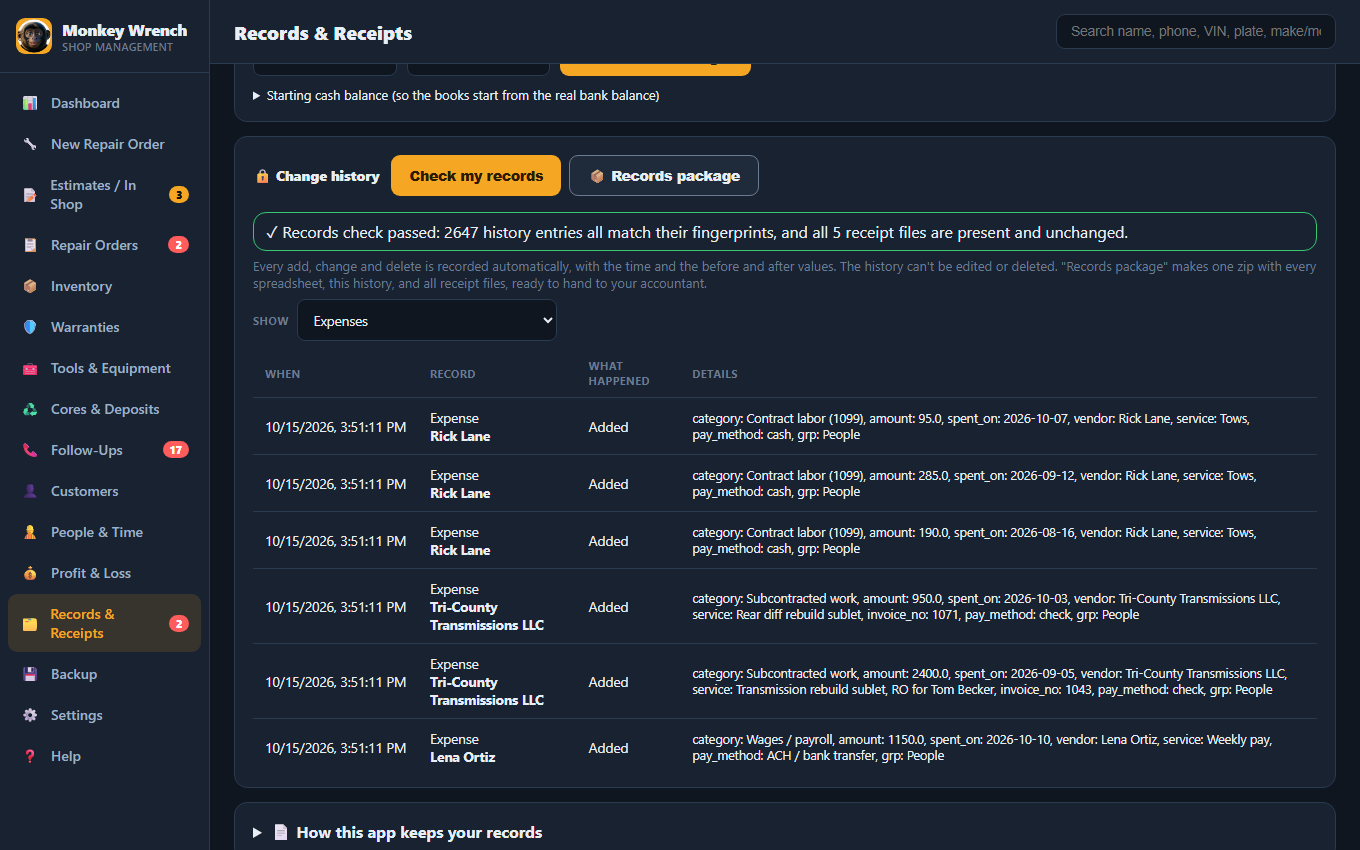
Every add, change and delete is recorded automatically and can't be edited or deleted from the app. Each entry is sealed with a fingerprint linked to the one before, and every receipt file is fingerprinted when attached. Check my records re-checks them all and tells you if anything was changed outside the app. Removing a receipt from a record keeps the file.
Records package
📦 Records package makes one zip for your accountant: the audit ledger, every spreadsheet, the change history, a receipt index with each file's fingerprint, the receipt files, a records check, and a description of how the app keeps records.
15. The audit ledger
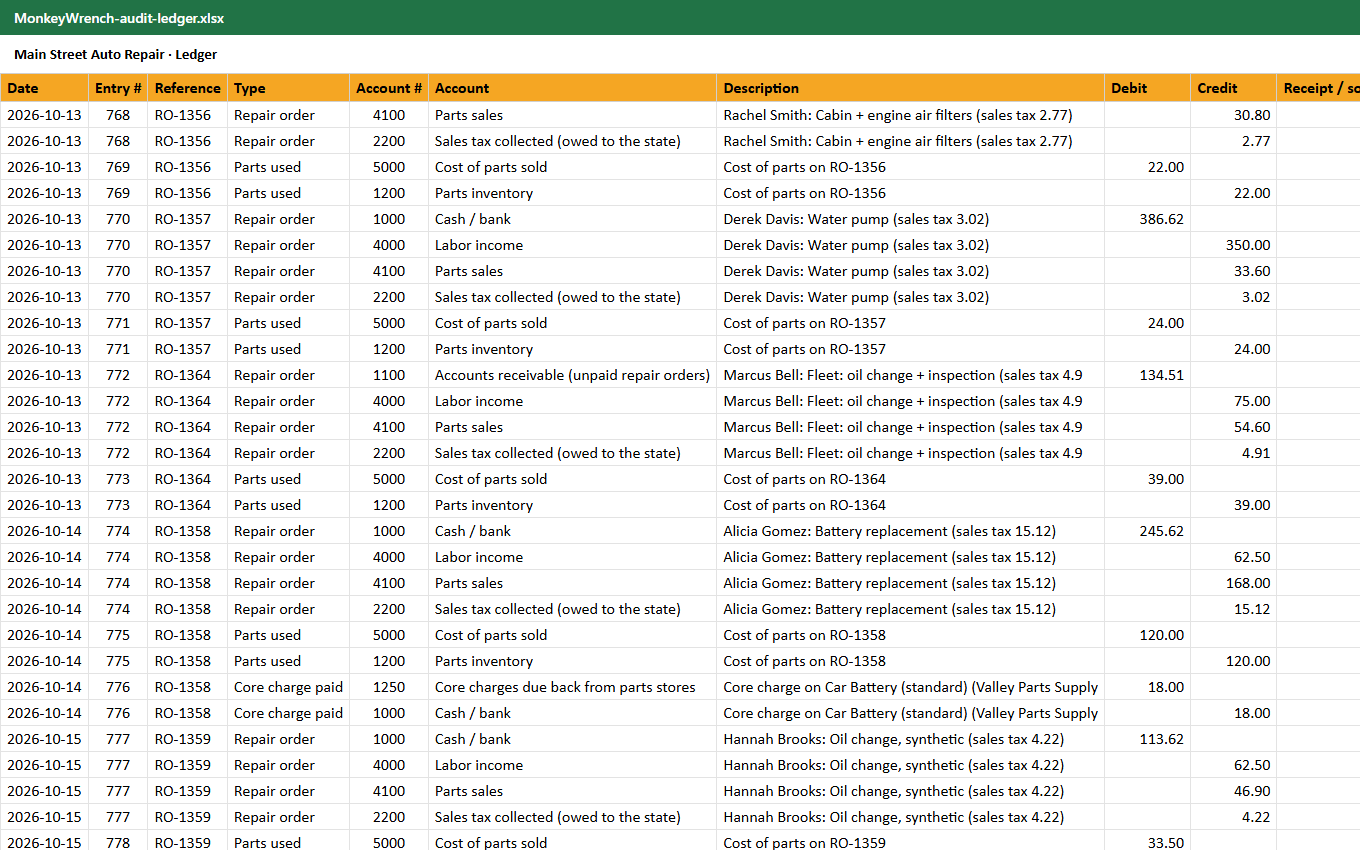
On the Records page, pick the dates and click 📒 Make audit ledger. You get an Excel workbook:
| Sheet | What's on it |
|---|---|
| Ledger | Every repair order, parts used, sublet paid, stock bought, expense, pay to staff and contractors, deposit, equipment purchase and depreciation: date, entry #, reference (RO #, invoice #), account, description, debit, credit, and the receipt file. Totals at the bottom show debits equal credits. |
| Trial balance | Total debits, credits and balance for each account. |
| Accounts | The account list. Expense categories keep the same account numbers every year. |
| Monthly summary | One total per account per month. |
| How to read | Plain-English notes, including the method used. |
It also saves QuickBooks Online journal import files (monthly summary and full detail). Set your starting cash balance once (the bank balance on the day you started using the app) so the books start from the real number.
Method, in plain words: income is recorded on the repair order's date. A paid repair order goes to cash; an unpaid one to money owed to you until it's marked paid. Sales tax collected is owed to the state, not income. Parts are inventory when bought into stock and become cost of parts sold when used; a part bought for one job is a cost on that repair order. Sublet work billed is income and what the other shop charged you is a cost on that repair order; shop fees are income. Core charges paid to the store are money owed back to you until the core is returned. A voided repair order stays on its date and a VOID line reverses it on the day it was voided. Equipment you owned before you started using the app comes into the books on your starting date. Depreciation is book depreciation; your tax preparer decides the tax figures.
If your QuickBooks already downloads your bank account, use the journal files, not the bank upload file, or transactions show up twice.
16. Backup & restore (important)
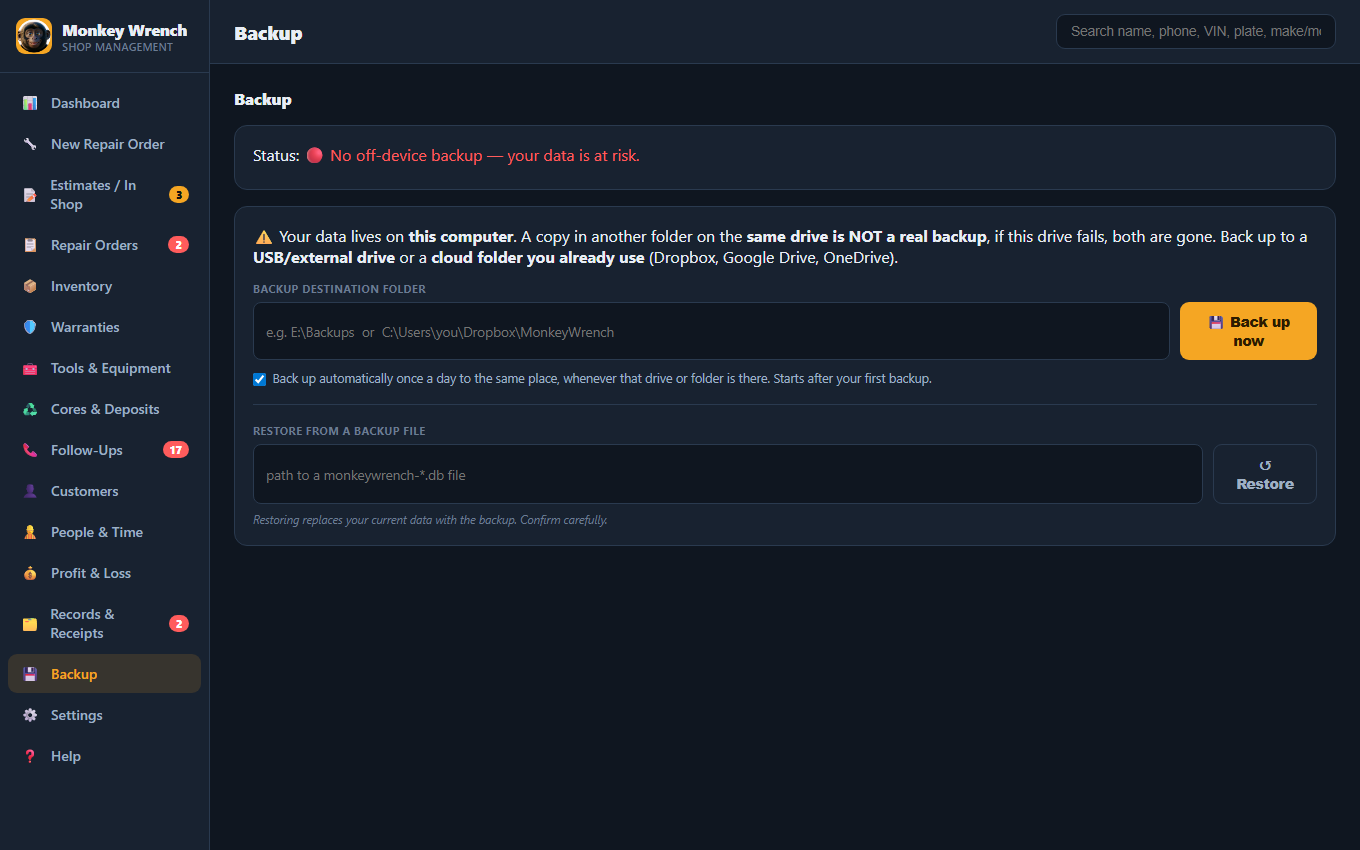
A backup copies your data, including the change history, and your receipts folder. Choose a USB or external drive or a cloud folder you already use (Dropbox, Google Drive, OneDrive); the app warns you if the place is on the same drive. If your data file is ever damaged, the app repairs it from your latest backup when it opens.
Automatic backup: after your first backup, the app backs up once a day to the same place whenever that USB drive or cloud folder is there. Turn it off on the Backup page if you'd rather do it yourself.
17. Settings & reminders
- Shop: labor rate, parts markup %, standard or metric, technicians.
- Sales tax, invoice terms and closing the books: your sales tax rate and whether parts, labor and fees are taxed (check your state's rules), your EPA ID number for hazardous-waste fees, your shop registration or license number, warranty terms printed on every invoice, the minimum wage used to check flat-rate pay, and Books closed through: once your accountant has filed, set that date and nothing on or before it can be added, changed or deleted.
- Your business on invoices: see Invoices.
- Reminders: small pop-ups now and then (cores to return, open deposits, warranties ending, customers due, low stock), how often, or Quiet. Each one shows at most once a day.
- Appearance: light or dark, window size.
18. Privacy, security & help
- Your shop's data is stored on this computer, not on our servers. The app goes online only when you activate your license (once), click Check email now, or click a link to our website.
- SSNs, EINs and your email app password are saved encrypted for your Windows user and shown masked.
- Use a password on your Windows account; it protects the shop's records.
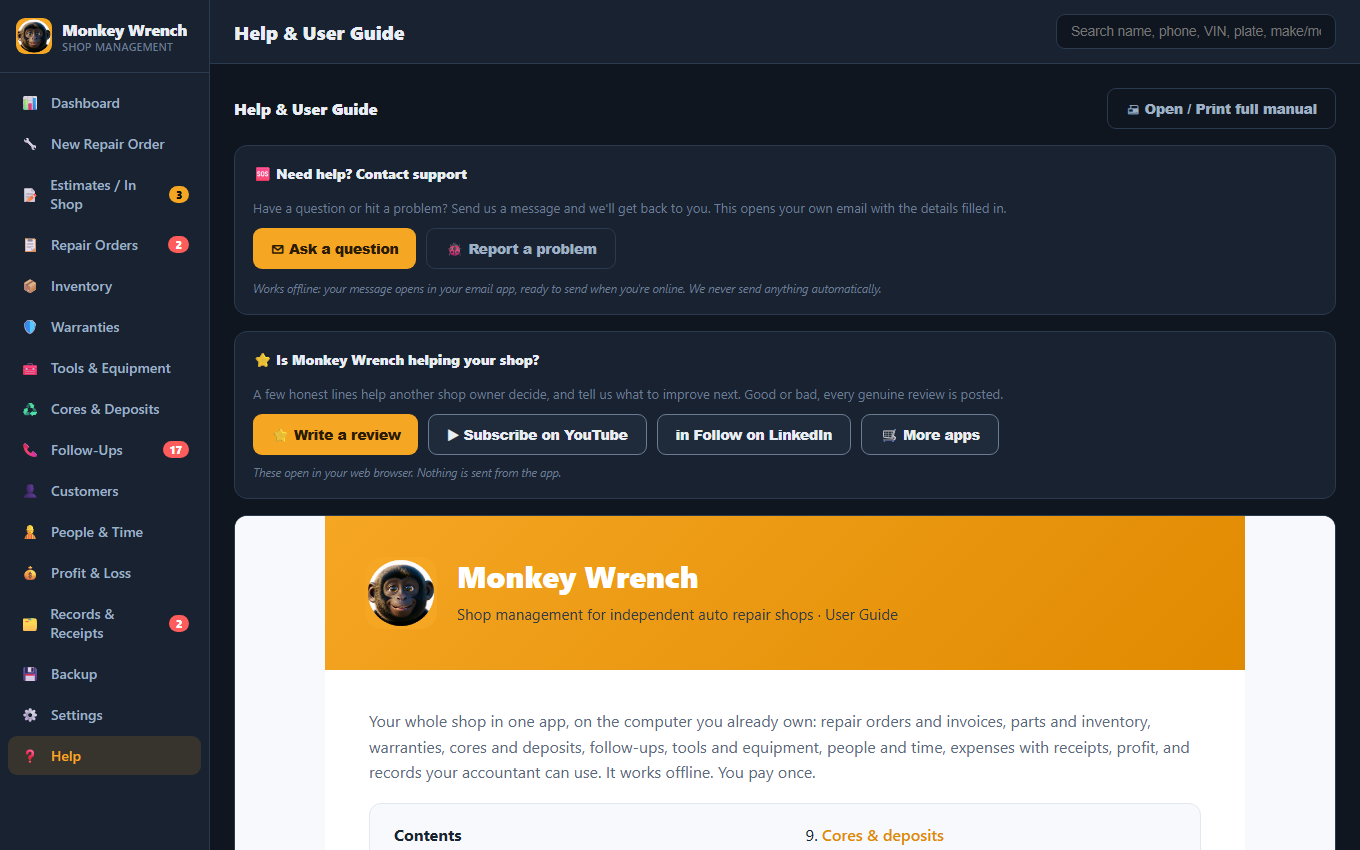
Is Monkey Wrench helping your shop? A short, honest review helps another shop owner decide, and tells us what to improve. Help → Write a review.